How Do I Engage My Core In Contortion?

So… I hear a lot of conflicting cues about what to do with your core in contortion. Very few people distinguish between deeper (transverse or TVA) engagement and superficial (rectus, external obliques) engagement. This leads to a lot of confusion in which people don’t understand how you can contract a muscle to extend the spine, as abs engagement is usually taught as using abs to pull things straight via tucking in.

Abs in contortion is a complex topic but at the same time very simple, if we were to clarify terminology in a concise and simple way. In this blog, I will break down how the abs work in contortion with different muscular groups to extend the spine safely. As this is a comprehensive topic, I will be explaining things as simply as I can while linking to further reading if you’re interested in learning more.

I will also be explaining some analogies such as what I call “energy lines” that will help you visualize how muscular engagement works in the body. This blog will act as a run down of important muscular engagements from the neck to the hips, as well!

The Deepest Layer Of Abs: Transverse Abs/ TVA: “Activate Your Black Hole”

Your transverse abdominis (also referred in contortion as “low core”, “low abs”, “deep abs”, “transverse abs” among other names; it also includes your pelvic floor) are your deepest layer of abs that basically holds your organs together, preventing them from spilling out. Their function is to stabilize and balance organically with your breathing; if you cough or you get hit by a strong wind, the TVA activates to stop your stomach contents from bursting. TVA activation happens naturally, organically, with your breath. The TVA acts as a stabilizer to the trunk in sync with the muscles that wrap around your spine (erector spinae) during breathing to control intra-abdominal pressure so your organs don’t burst out of your skin. Over-activation of the pelvic floor muscles during activity daily living or working out may lead to pelvic floor dysfunctions such as urinary incontinence or constipation (a nice way of saying involuntarily peeing because your pelvic floor muscles are so overworked that they can’t perform basic functions like retaining pee).

In contortion, the TVA stabilizes and balances, bringing things back to the center, in addition to helping you square your hips by providing inner stability. They also help you find your balance when you pull your spine back to neutral from a backbend. They are, basically, the root of your muscular engagement.

How does the TVA contract in contortion? To understand this, there are three types of muscular contraction: concentric, isometric and eccentric. A concentric contraction occurs when muscles shorten to generate force (such as when you punch someone); eccentric contractions occur when muscles elongate in response to a greater opposing force (the bottom of a squat). Lastly, isometric contractions generate force without changing the length of the muscle (holding a weight in a static position). During backbends, the TVA contracts eccentrically by pulling inwards towards and the back and inwards, towards the sides.

(source)

In a dropback, for example, the TVA would contract eccentrically during the initial backbend to lengthen the spine, isometrically at the end range of your bridge (as the body is static and stabilizing, yet your TVA is still engaging to support your body) and concentrically when coming back to standing by pulling the spine straight, like pulling a rubber band back to taut.

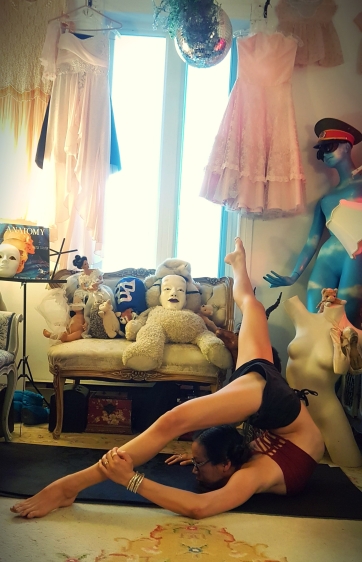
However, it’s important to note that the pelvic floor and transverse abs tend to be underdeveloped in hypermobile people, so hopefully the below images and explanations to follow will clarify a few things.

How To Find Your Low Abs: Visualize A Black Hole Sucking Energy Into Your Pelvis

In contortion, I usually think of the lower abs as a black hole pulling energy into the pelvis. To feel it working in daily life, lie on your back with a small towel under your low back. Put your legs in a 90 degree angle and put your fingers on top of your pelvic bones. Gently draw energy into your pelvis with your exhale, noticing your transverse abs drawing down and away from your fingers as you do so. Try to make sure your front abs aren’t over-engaging: if you put your fingers on your ribs, they should not be sucking in intensely. Notice how your low back pushes into the towel softly as you exhale. You shouldn’t be pushing too hard into the towel either. One of my students would use a blood pressure monitor below her low back to ensure she wasn’t over-engaging through her front abs: the needle should never rise above a certain point, a visualization I find useful to keep in mind!

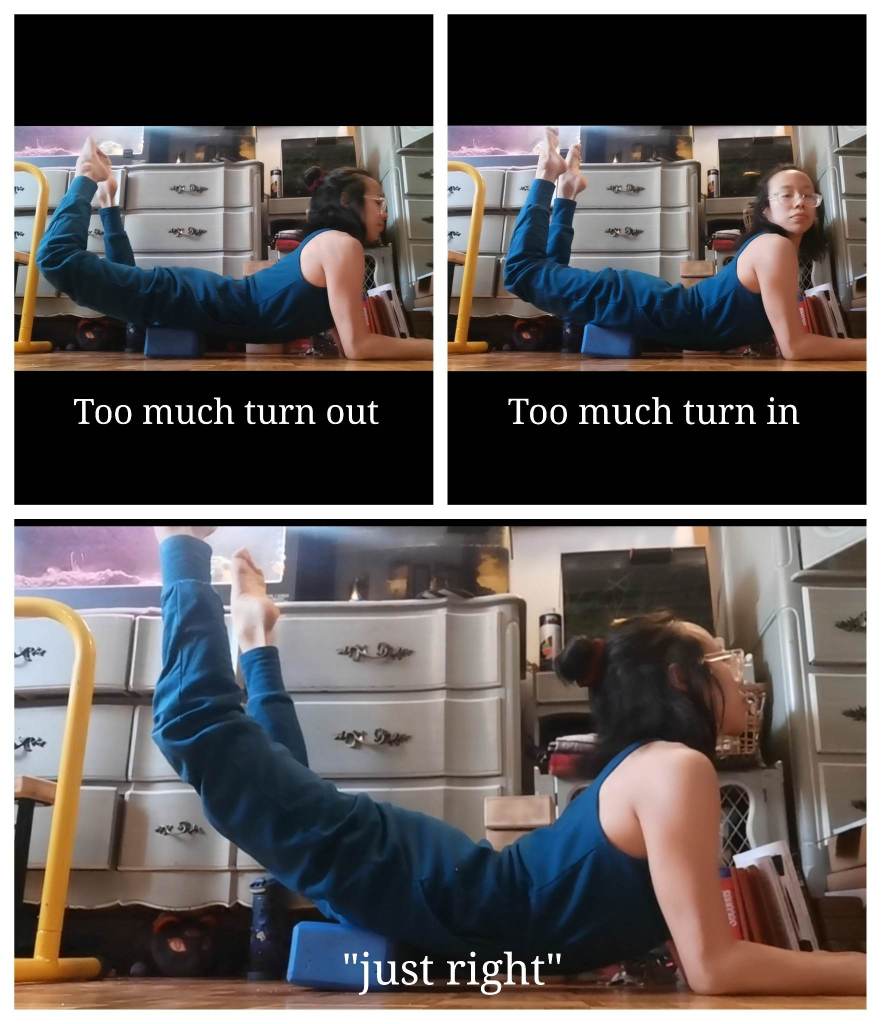
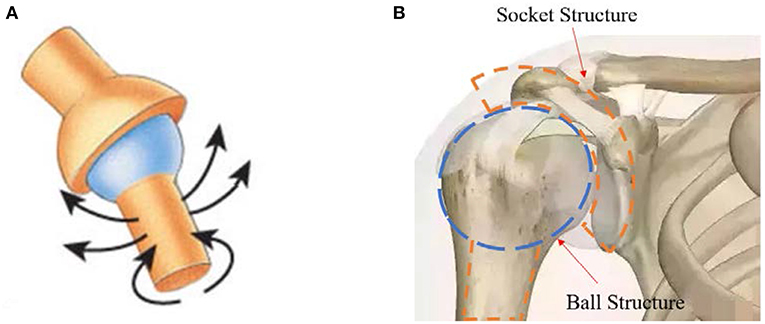
Now, go into a low lunge with the inside of your front knee aligned with your belly button by engaging your hip adductors (inner thighs) to create stability without the low back collapsing. Notice how your hips can shift in different directions within their sockets if you add a slight backbend, pulling your torso off center. Now, visualize a black hole pulling energy into your pelvis to pull your hips center. It should feel like a “lock”- if someone came in and pushed you off center or a strong gust of wind entered the room, you would not budge. This is what I call your “hip lock” (similar to your “shoulder lock” in handstands that is basically shoulder blade elevation and protraction) which can be used in all positions that involve hip extension. Now, work on adding a little backbend from your upper back to your lunge and notice how the black hole in your hips keeps you from twisting away from your front leg. You will also notice that your hips will get a much deeper stretch and square easier when your lower abs are engaged.

“Black hole” also can apply to various other backbending postures such as a dropback.

Take note you can *give the appearance* of squaring your hips without the TVA working in a lunge, but you would have to stabilize using only your superficial muscles. For example, if your left leg is in front, your right obliques would have to engage more to prevent twisting, the right shoulder would have to shrug extra, and the front inner thigh would have to fight to death to prevent the hip rotating out of the position. Some coaches will cue “pull the front hip back, back hip forward” but this cue is not as useful without the TVA working first. You can visually square your hips but be easily thrown off balance if any piece of the puzzle is shaken up. The TVA provides extra stability so you don’t have to work so hard in your more surface-layer muscles. Or, as my coach says, “If someone punched you, you shouldn’t get out of the position.” (She was talking about the shoulder lock in handstands, but this applies to hip lock, as well!).

The front abs contract to expand the stomach, so the spine can extend.

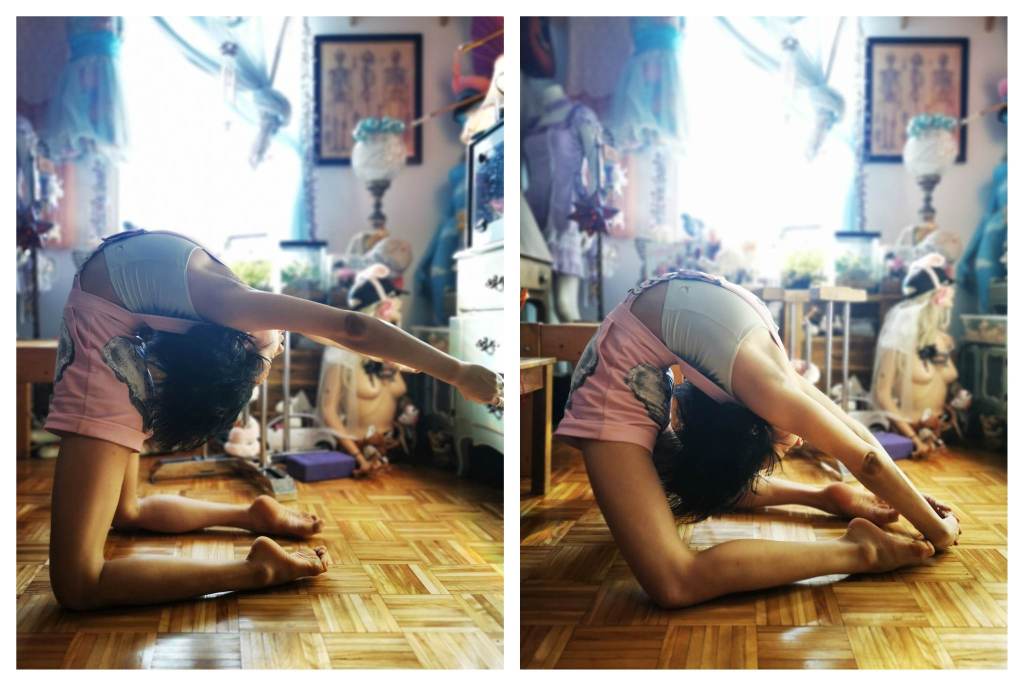
Rectus Abdominis: The “Ab Balloon”

The rectus abdominis, also referred to as your front abs, “superficial abs” or six pack abs, is directly in charge of extending your mid and lower back, together with other muscles that wrap around the spine (your lats in the back and obliques on the side). As a team, they contract to extend your spine from the front like pulling a resistance band taut; I like to visualize this as a corset wrapping around your middle and lifting you. Placing your fingers around your sides and back or along your stomach and tangibly lifting your torso in and up will help you find this engagement better when you are bending. Please note that just as the rectus abs contract to pull your spine in in a sit up, they can also contract eccentrically to extend your spine via expanding. When you extend through your low back, you inflate the ab balloon via contraction. When you pull your spine back straight, you contract your front abs to pull your stomach back in, as in a sit-up.

The rectus abs works with the hips (both in extension and flexion) to extend the spine, while the transverse abs provides stability for the rectus abs to work from. Like a balloon, the rectus abs contract to extend the lower back. In the 2nd picture, the abs are flat and the hips not extended, so the low back crunches.

The rectus abs can work with your hips in extension or flexion and in all different backbending positions. Take note that they work *with* the transverse abs but separately. Meaning, it is possible to expand your ab balloon without your transverse abs locking in, and this can cause issues as well. If the center isn’t solid, everything will feel like it is falling apart.

The lats help support the mid and upper back in spinal extension by wrapping around our backs and aiding with shoulder flexion (extension in contortion terms).

I’ve seen some people misinterpret front abs engagement as purely “tucking in” to pull the spine straight or passively inflating, maybe because some coaches use the cue “zip up your pants” to cue both rectus and transverse abs. However, even if these cues work for other activities, they are not so productive for contortion. When engaging front abs, think about tucking in to pull the stomach into expansion, thereby extending the lower back.

Front abs engagement also prevents rib flare, another point that confuses many because the ribs will always look flared in backbends. However, there is a different from over-stretching the intercostal muscles with no front abs engagement which will put strain on your ribs, causing possible subluxations and even back pain if you are hypermobile. Imagine if someone pushed on your mid back but you didn’t focus on expanding your stomach via contraction: it is likely you will flare your ribs in a dangerous manner. If you expand through your front abs, you will also offload your intercostal muscles as your front abs are doing their share of the work (and are comparatively more supportive in a backbend). In addition, the lats that wrap behind your ribs and under your shoulder blades provide additional stability in lifting and expanding the torso like a corset.

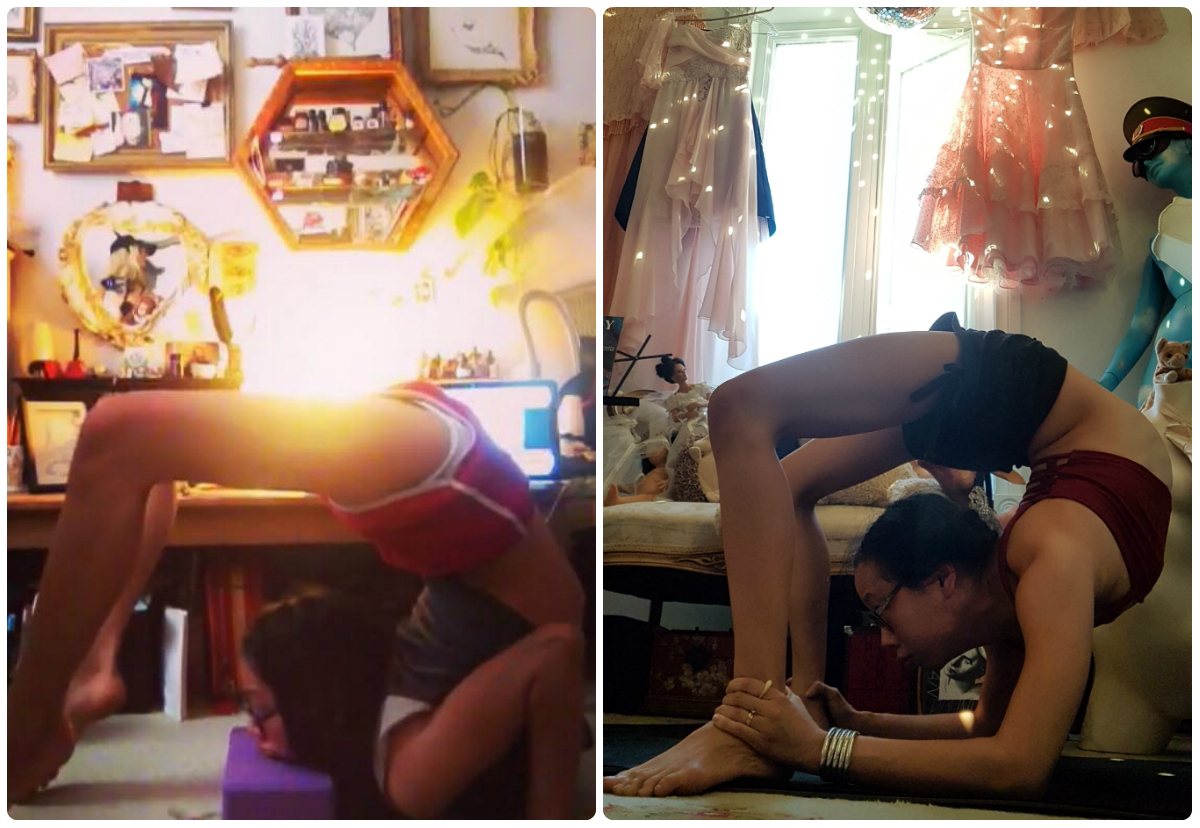
A Valuable Analogy: Supermans And Hollow Body Position

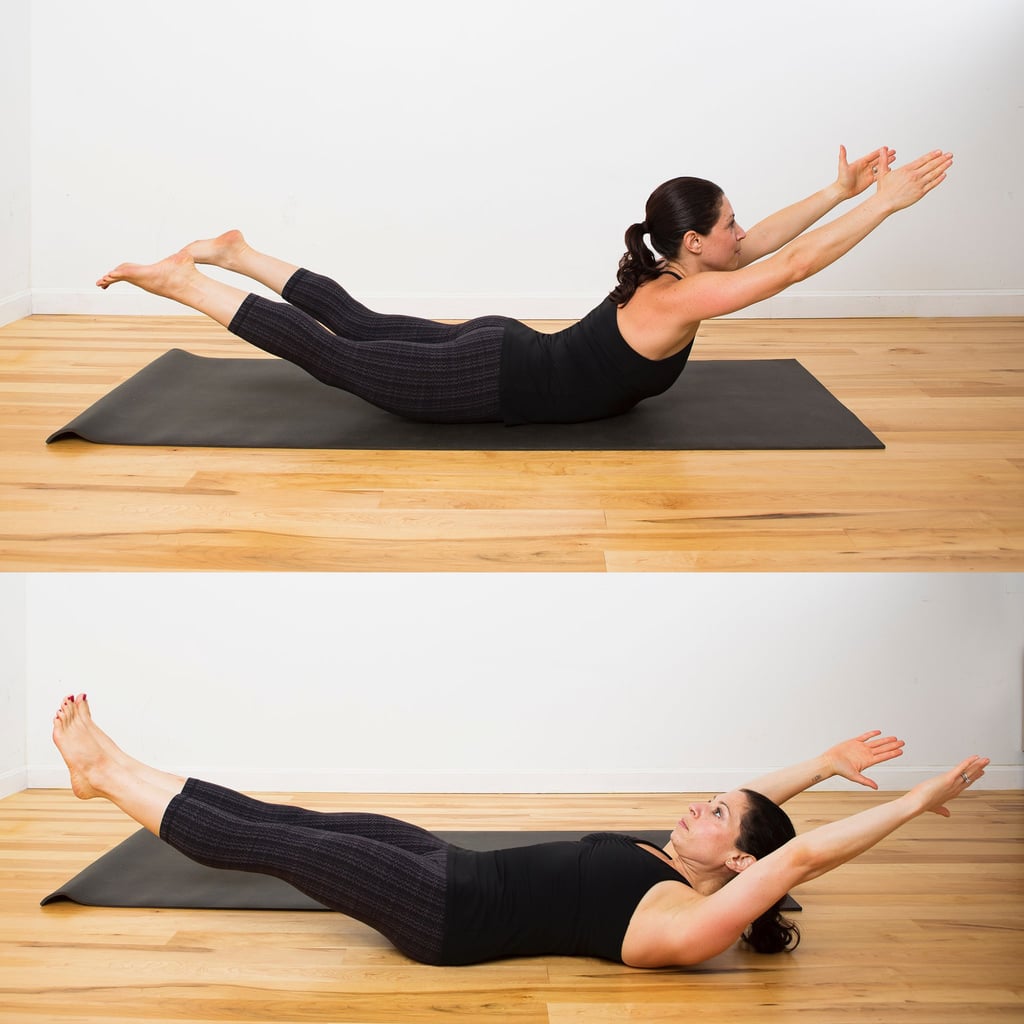
I feel like most people will understand hollow body/ disc position, also familiarly known as the engagement we use in straight-body handstands. We engage the front abs with the lower abs here to create a disc shape. In a superman, similarly, we engage the lower abs with the front abs in extension to create a superman, boat-like shape. Even though these positions may seem quite different, they involve similar ab engagements in opposite directions.
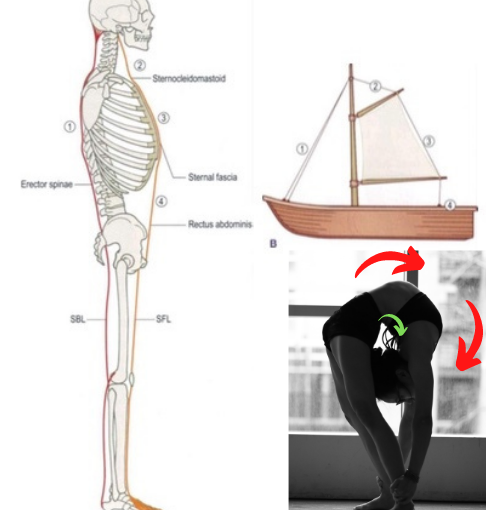
The Boat Analogy

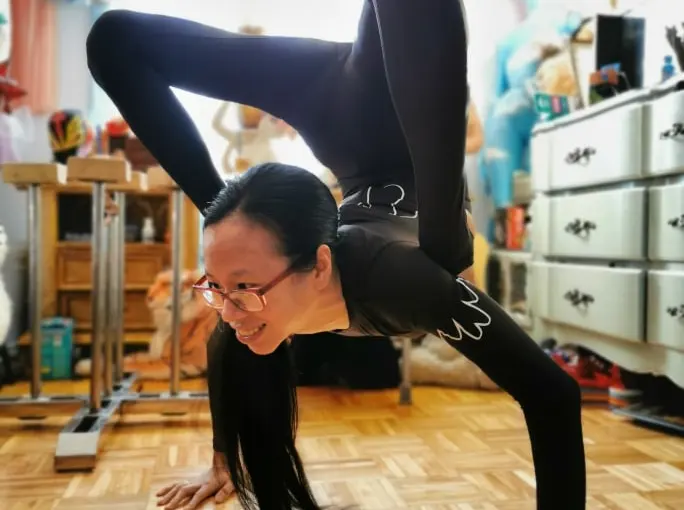
Contortion can be summarized simplistically as contracting and expanding the front body (stomach, ribs, chest, hips) to contract and compress the back body (your entire spine). Elongation, as such, is the name of the game. The longer you are able to expand your front, the more range of motion there will be between the veterbrae of your spine. If you fail to expand your spine enough, it can crunch at any point, causing pain usually in the middle and lower back. The front abs, thus, help to elongate the spine by elongating the front body, while the transverse abs provide inner stability. Just like the bow of a ship, one end of your body helps the other to achieve overall stability.

The lats, traps, rhomboids and serrates muscles all form a team wrapping around your shoulder blades helping in upper back extension and overhead shoulder mobility (what is known in contortion as shoulder extension, but in physio terms as shoulder flexion). Together with the front line of muscles, they help you extend your spine by elevating and protracting your shoulder blades when your arms are overhead, or elevating and retracting your shoulder blades when your arms are by your sides. I call the former (shoulder protraction with arms overhead) “reaching for the cake” (shrugging and reaching for an object behind you) ad the latter (shoulder retraction) “dramatic yawn”. Take note shoulder protraction also occurs in contortion inversions, but that’s a topic for another blog post.

“Dramatic yawn” is squeezing your shoulder blades together (retraction) to open your sternum.
“Reach for the cake” is shoulder elevation, protraction and external rotation (like a straight handstand) to elongate the sides to ‘grow the shoulders’. This movement helps the upper back to curl through the shoulders. If the shoulders are insufficiently shrugged/elevated or internally rotated (armpits turning out), the upper back & neck will get left behind as the shoulders bend for the upper back.

Line Of Energy: Neck Leads, Hips Pull

Here, there are two lines: the hips pulling forward and the shoulders reaching horizontally, as well as the line from the hips up the front body to the neck elongating to compress the spine.

Contortion is all about how to leverage our body to expand our spine the most. There are many very creative ways we can use tools such as walls, blocks, bands and straps to maximize our muscular engagement to pull deeper into bends. However, I find visualizing what we are leveraging helps you to access muscular engagement in whatever situation you are in, whether you are in a lunge backbend, a chest stand or teardrop.

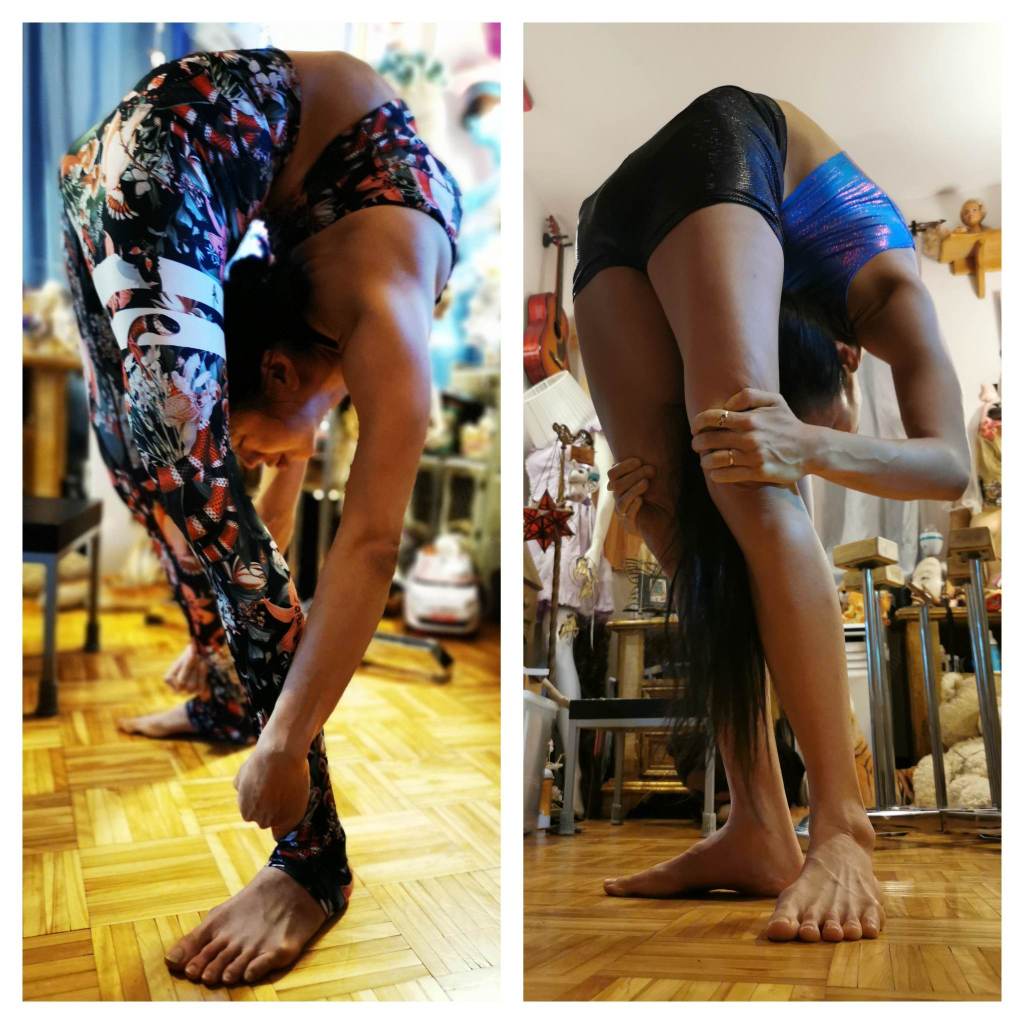
In a lunge backbend, I like to visualize a line of energy reaching from your hip (originating from your transverse abs) up your front body through your ribs, sternum and ending in your neck. Take note that this line of energy originates from the black hole abs (TVA activation): I think of your TVA as fuel for your other lines of energy, creating a core center of stability. If the arms are overhead, the lats help with elevating your shoulder blades and the serrates keeps your armpits in so you can shrug and reach with your shoulders (conversely, if you are leading with your shoulders turning out, your upper back gets left behind). I like to observe and take note of where I can tuck and lift anywhere along this front line to expand my spine more. Oftentimes, putting your fingers on the side of your ribs, your stomach or sternum provides a tactile cue to lift and expand more. As I am trying to find space along this line, I also counter-pull the hip flexor forward as I extend through the shoulders. Hence, we have two lines of energy: one horizontal (hips pulling forward as shoulders reach horizontally) and one circular (energy radiates from hip to side of neck).

In a dropback, similarly, there is a line of energy reaching from your hips up your front body to your neck. As your hips lift forward and upwards like a circle, your neck and upper back curls forward, down and in. The shrugging and reaching of your shoulders helps elevate your shoulder blades so you can feel the counter-pull of your hips. Center of mass remains in the middle of your shape, approximately where your hips stand. Hence, the more the hip extension (“rounding the hips”, see this blog for more information on this concept), the easier it is to reach with your shoulders. If the hips hinge forward too much without the shoulders counter reaching, the center of balance shifts forward and you fall towards your knees. If you don’t reach enough with your hips, you fall back onto your hands. Thinking in terms of lines of energies will help you troubleshoot what is missing: are you engaging your low abs, your front abs, your inner thighs, your lats, your neck muscles? Observing from the outside of your body like a spectator is a skill that will allow you to know exactly what is going on in your body.

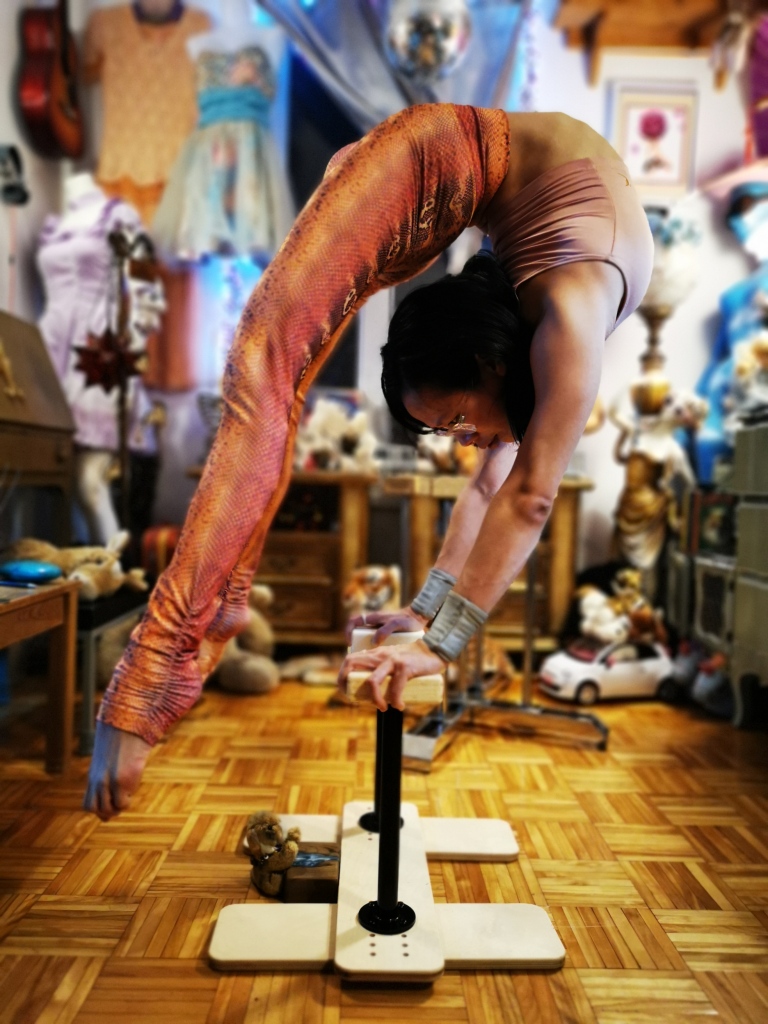
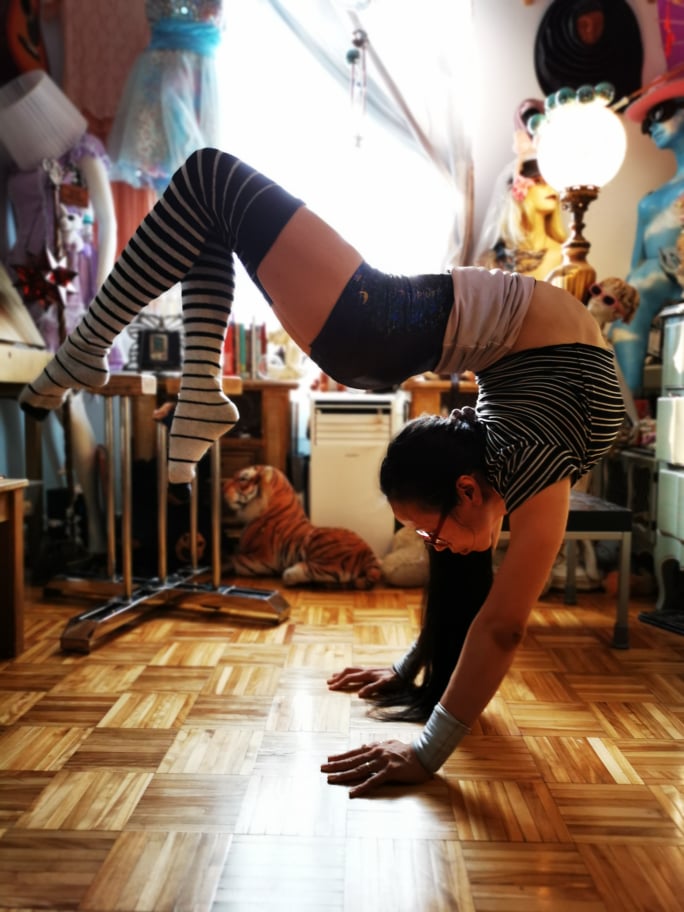
Lines of Energy Illustrated: The Classic Chest Stand

In a classic chest stand (which I define as a chest stand with your legs bent or straight), it’s important that the front abs pull horizontally away as the hips reach forward. These opposing lines of energy pull the body horizontally: The belly pulls backwards in the opposite direction of the hips reaching forward, forcing the middle and upper back to extend more, creating more space in the spine. The inverse- leaning into the neck by just pulling the hips over- creates pressure on the blood vessels in the cervical spine. This registers as a huge blood pressure spike in the body, causing the arteries in the rest of the body to dilate, because dilating the arteries everywhere in the body would reduce pressure if you really did have high blood pressure. As a result, this leads to suddenly less blood being pumped into the brain, resulting in dizziness or sometimes even passing out.

Turtle Neck”: The Start And End Of Everything

Let’s talk about neck and gaze: an important part of contortion. I like to conceptualize the neck as a tunnel of muscle. Expanding the tunnel via a chin tuck in or out helps the thorax and wind pipe to exist freely so you can talk and breathe. In many things, especially chest stands, we use the end range of our neck. If we do not engage our neck, our neck will collapse like a watermelon. In a chest stand, this can cause pressure to the base of your neck, making you feel faint.

Proper engagement of the neck connects the head to the upper back via the sternum/chest lifting. When I look back, my chest will also follow. If I require extra neck extension, I will often tuck in or out before extending my neck to get extra upper back. The action of tucking engages the side of the neck and hardens the walls of the tunnel, allowing me more space to breathe, talk or even laugh. Hence, in a handstand or chest stand, I often think “turtle out of my shell” to find more space in my upper back or neck.

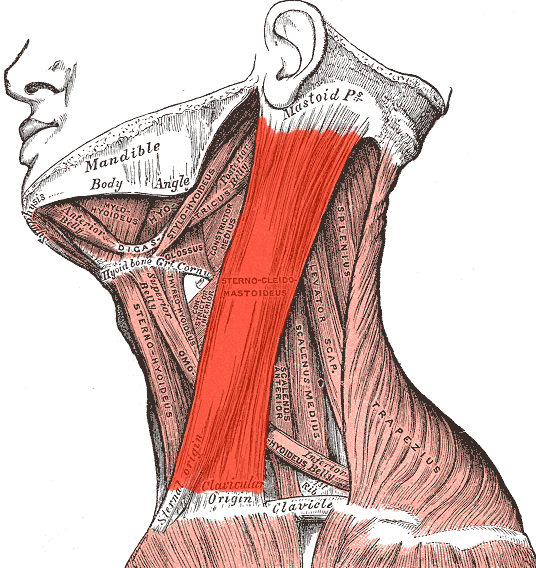
What is turtle neck though? They are, technically speaking, the sternocleidomastoid muscle (SCM for short) and they run on the side of your neck and insert into your sternum and clavicle. The SCM acts like TVA of the neck, helping to stabilize the clavicle and acting also as an additional breathing muscle. Together with your upper traps, they aid in neck extension especially at end ranges. One common compensation I see in student is over-engaging the upper traps (the triangular muscle behind your head) without adequately elongating your turtle neck. Doing so will compress the cervical spine, causing the veterbrae to crunch against each other, creating pressure in the sides of the neck and shoulders and prevent you from reaching the end of your shoulder and upper back range of motion. This poses many dangers, as we have many arteries running on the lateral side of our neck including one important artery that regulates blood pressure. If too much pressure is put on this artery, this registers to the body as a blood pressure pike and it wants to reduce blood pressure by dilating all arteries, meaning we don’t get as much blood up to the brain. This results in feeling faint or as if you will pass out (and, in some cases, you do). For this reason, it’s rather important to use the SCM/ turtle muscles to extend the cervical spine so we don’t crunch our necks with the weights of our skull!

Why is neck extension so vital for contortion? It is what leads our engagement. Where our gaze, balance follows. Likewise, if we crunch our necks, we won’t have space to breathe, or talk, and may even feel feelings of fainting. This is a rather complex topic I’ve only brushed on, but this other blog may be of interest if you would like to learn more.

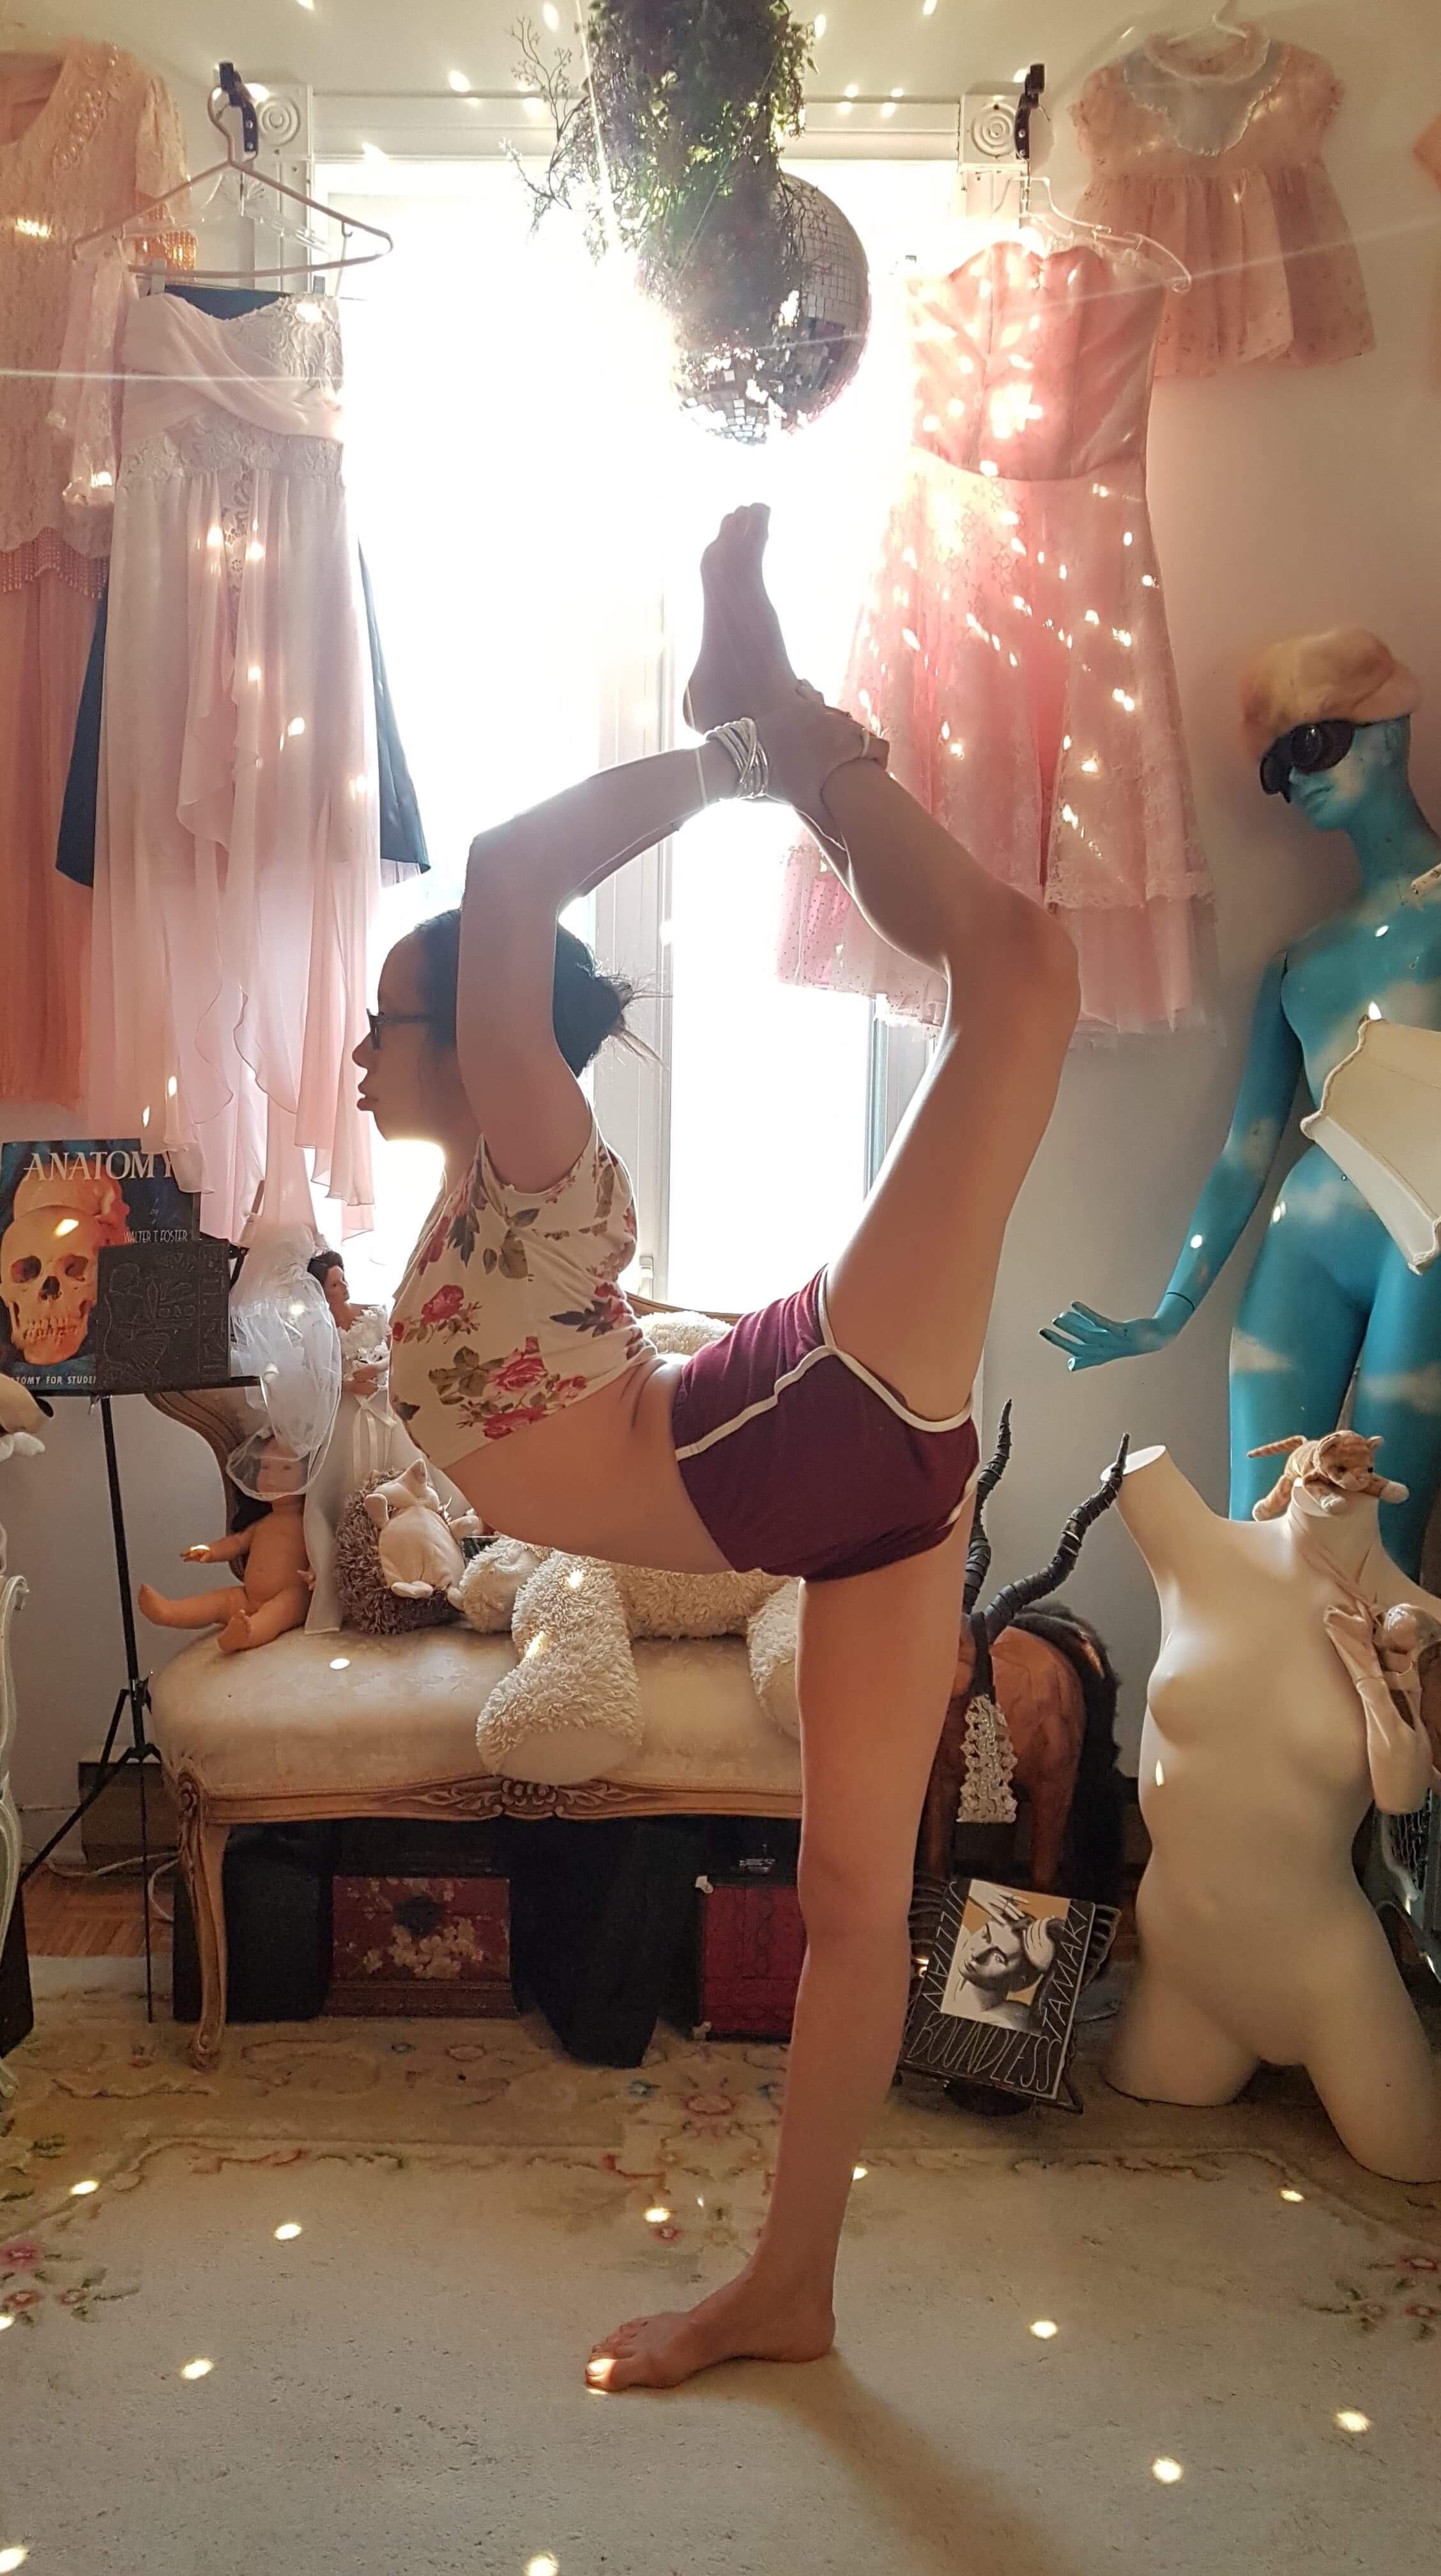
Lastly! Point Your Toes: It Helps You Find Your Start And End Of Your Line Of Energy

Pointing your toes isn’t just aesthetic: it helps you connect your center of energy (black hole abs) to the end of your energy (your ankle engagement or toe point). In hip extension, you will often hear the cue “don’t squeeze your butt too much but elongate through the leg”. What this means is your glute max (big butt muscle) shouldn’t be over-engaging in contortion. Rather, the under-glute (hamstring insertion), side butt and inner thighs need to work together to elongate the hip. Thinking of elongation rather than just reaching your leg straight helps to understand the nuance between squeezing blindly vs. activating the right muscle groups to extend the hips.

Oftentimes, we have to juggle so many different patterns of engagement. Just thinking “Point your toes!” helps you to connect better to your inner thigh and hip engagement, especially in positions such as contortion one arms where you have so many things to think about already.

To Wrap It Up…

This blog was an ambitious effort on my part to summarize muscular engagement in contortion in a concise manner, the latter of which I am unsure if I passed or failed. If there is anything you remember, always start and end backbends with your black hole abs, then expand with your ab balloon and find the rest of your lines of energy. Hopefully, you will find this methodology translates quite easily into many contortion postures!

Further Reading:

Anatomy Trains talks about fascia lines, an idea I briefly covered.

Too Flexible To Feel Good talks about common compensations in hypermobile people. It also explains muscular engagement in a simple to understand way.

Thank you to Mor Mualem for additional physiological help and Tanja Hoch for the information about fainting in chest stands!

4 Confusing Cues in Cobras/Dropbacks And What They Actually Mean

Cobra and dropbacks are some of most basic shapes in contortion, but they also seem to be the postures that my students are the most confused about, partially because coaches tend to give conflicting cues in regards to these moves. In both these shapes, the tendency is to crunch into the lower back and not use the hips. In this (I hope) concise blog, I will list some of the common cues given for these shapes and what they actually could mean.

Cue 1: “Squeeze Your Butt In Cobra”/ “Relax Your Butt”

Both these cues can actually be right! Firstly, for the purposes of contortion, it helps to break down butt engagement into three parts: the glute maximus (“big butt” as I call it), the glute medius + glute minimus (the “side butt”) and the under glute muscle (not technically your butt, but the upper part of your hamstrings, also the biggest worker in cobras!). The side butt not only helps with stabilization of the pelvis and bringing your leg out to the side, but also helps in moderating internal rotation alongside the glute max. Cobra requires somewhere between internal and external rotation of the hips, meaning you’re both turning in and out at the same time! As such, the side butt and your underbutt are the main workers, *not* your glute max.

Oftentimes, when people hear “squeeze your butt”, they will automatically squeeze their glute max too strongly, which can actually cause more pressure on the lower back and block the hips from lifting. If you’re doing so, you may actually want to relax your butt a bit so you can make space for the other parts of your butt to work. Engagement of the side butt and the underbutt works via the inner thighs and lower abs. A better cue, here, would be “pull the inside of your knees towards each other to spiral out the hips, as if you’re pulling a band apart between your thighs”.

Take note that this over-squeezing of the glute max tends to also happen subconsciously, perhaps because of the body over-compensating due to feelings of panic or lack of proprioception. The body tends to do this in positions such as box, scorpion elbow & handstand or camel. When you’re doing camel or box, try focussing on your knees and feet pulling apart instead and take note of what muscles are working! Likewise, in scorpion handstand or elbowstand, it may be more beneficial for you to focus on using the low abs to lift the butt over and a slight inner thigh engagement to help the legs descend down rather than squeezing your butt deliberately. This is as the lower belly muscles help stabilize the pelvis via a posterior pelvic tilt so the pelvic floor muscles can engage, which in turn allows you to relax your hips down!

Cue 2: “Push Your Hips Into The Ground In Cobra” / “Lift Your Hips Off The Ground In Cobra”

Often times, coaches will ask students to push their hips into the ground while others will say to lift your hips off the ground, but what do they actually mean? This is all rather confusing, so let me explain why both of these cues are, in their own way, correct.

In a deep enough cobra, the low back doesn’t actually need to work a ton.

So firstly, the cue ‘pushing hips into the ground’ is actually supposed to encourage you to use your legs a bit more actively. However, this cue is also quite vague. One thing I like to focus on initially is pulling the inside of your knees in via your inner thighs so you feel your hips push into the ground. This anchors your legs down so your upper body doesn’t feel too heavy. From there, you use your lower abs, glutes and front abs to lift up and over so the hips can, yes, eventually leave the ground.

The first picture shows compensation via the mid back while in the second, the ribs, stomach and hips are almost on a straight line.

For perspective, the highest point of your flying cobra should actually be your hips, not your lower back or ribs. If your ribs or belly are poking out of your flying cobra, you are probably compensating through the mid or lower back. One way to fix this is to pull in and up through whatever part of your front body is sticking out to lift the body more towards the knees. In an ideal world, optimal hip extension creates an at least 45 degree angle between your belly and the ground, placing your head almost on top of your knees! If you do this, you will feel flying cobra is quite light, and you’ll even have the freedom to play around in it!

One useful thing to try for cobra, in general, is to put a band around your ankles, calves or thighs or push just your toes into the wall so your knees are off the ground. Both of these modifications will force your legs to work a little harder so you’ll be conscious of what’s actually happening in your body. Do take note and observe what muscles turn on/ off to help your hips to lift or how pulling your feet apart or together changes your bend. These are all details that you can modify based on your individual body to feel the most hip lift!

Cue 3: “Keep Feet/Hips Parallel In Dropbacks“/ “Turn Out your Feet / Hips In Dropback”

So, this is a ‘controversial’ topic and the answer is again… It depends! Someone with natural internal rotation of the hips may find it valuable to turn out a bit more consciously through the inner thighs. Likewise, someone with natural external rotation of the hips may find it easier to turn in more than average.

Regular teardrop versus teardrop with no hip extension/ internally rotated hips. You can turn out feet while hips are internally rotated. Likewise, you can also turn in feet with hips externally rotated.

Firstly, it helps to consider that feet turn out =/= knee or hip turn out. One can have completely parallel feet and turned out hips, and vice versa. It helps more to think about what your inner thighs are doing (are they rotating outwards (too loose) or inwards (too tight) too much?) and how that helps your hip extension. Someone with naturally bowed legs may benefit from having a band around their thighs to isolate the inner thighs to turn out hips rather than just turning out the feet. Likewise, someone with natural turn out may need to turn in slightly through the inner thighs and hips to find the right rotation for them.

As a coach, I’ve seen both: people with bowed legs (internally rotated hips at rest) and turned out legs (hips just turn out passively at rest). Both types of body would require different cues, also depending on the person’s body awareness and how they connect their low abs to their hips, deep rotators and inner thighs. As such, saying “you must have parallel hips” or “you must turn out your feet” is counter-productive. Notice what your habits are at rest and adjust accordingly.

One useful exercise to try is to put a band around your thighs while standing and push your hips forward and outwards slightly (spiral away from body) without bending the lower back. From here, try to notice how pushing your big toes and the insides of your legs as if you’re pulling the group apart helps your hips to extend upwards. What do you feel? Do you feel your under-glutes and side glutes working? Do you feel your inner thighs helping your hip extension? Do you feel you may need to turn in or out to extend your hips? What about your pelvic floor engagement? Sometimes, just cultivating awareness is a skill that should be developed individually so you know how to modify cues for you.

The tensor fascia lata helps with the stabilization of your hips in teardrop shapes.

The band not only accomplishes more awareness of whether your hips are internally/ externally rotating too much, but it also helps you to engage your tensor fascia lata (often very weak in hypermobile people) which adds to pelvic stability for deeper shapes!

“Goldilocks hips”

Keep in mind that you don’t want your feet *too* turned out or far apart. There is a sweet spot for hip engagement in contortion that’s not too turned out or in, just somewhere in-between, just like Goldilocks’s porridge. One way to understand how much is ‘just right’ is to go on your elbows with your hips elevated on a block. Bend your knees and put your feet together so you’re more externally rotated. Then, roll in and up and notice how much internal rotation actually creates a higher angle in the hip. But if you overdo this, the hips also get blocked. This can also be done with straight legs! This engagement carries over to many things: cobras, dropbacks, teardrop, scorpion handstand or elbowstand and camel.

Cue 4: “Push Your Hips Over Your Ankles In Your Dropback”

This isn’t exactly a bad cue, but one that’s often misinterpreted. More commonly, I see students hinging forward to the point of no return or crunching in their lower back. To explain this better, let’s bring out one of my main contortion methodologies…

In Contortion, We Love Spirals and Circles, Not Angles and Squares! So, Be A Circle. Don’t Be A Square!

Angled hips/ circle hips

One thing that’s helpful to remember is that contortion is always about spirals/ circles. We don’t want angles/ squares- this usually means you’re not engaging or you’re crunching into your back. So your hips aren’t just going forward over your ankles; your inner thighs are actually spiraling outwards to open your hips, while your hips are lifting forward, up and back like a circle. If you think in terms of these two directions- spiral in /out, circle forward, up and back- both cobras and dropbacks will make a lot more sense.

So in a way, rather than saying ‘hips over ankles’ for dropbacks or teardrop, a cue that may benefit students more is “push your hips over your ankles *then* upwards like a circle, while visualizing your hip bones spiraling slightly outwards through the inner thighs”.

“V” hips versus “C” hips. Keep in mind you have to pull the front hip back as you pull the back hip forward as you do this, or you will also just be cheating to achieve the C aesthetic.

The prior cue of pulling the ground apart with your big toes will also help here. This anchor will help you feel how your inner thighs actually help your hips to spiral outwards (turn out). A band around your thighs will also accomplish a similar muscular engagement: pulling the band apart will help you understand how your inner thighs help your hips to lift up.

This also applies to your lunge! We want to use the lower abs to pull the back hip forward to make that lovely C aesthetic without your front hip deviating sideways or forwards. Pretty much, if the angle of your hips looks like a V rather than a C, you’re probably not using your hips properly.

To Sum It Up…

A lot of this post focussed on hip engagement. However, I need not say your upper body (shoulders, neck and upper back) are equally as important in ensuring a healthy bend. For the purpose of conciseness, I am only addressing hips and low core engagement. However, you should take a look at these posts: “Why Can’t I Fly my Flying Cobra?” and “Why Do My Shoulders Tingle in Bridge and Full Cobra?” for further elaboration on how to use your low abs and upper back to avoid lower back pain.

If you learn anything from this post: look for spirals and circles! Not just in your hips, but also in your backbend. This will help you a lot in examining how your individual body bends and how to correct it for optimal sustainability! Also, when a coach gives you a cue, try to figure out what it means for *your* body. Not all coaches will adjust cues for each individual, so cultivating an understanding of your own individual proclivities is important in being able to modify drills for yourself. And, in my opinion, a good coach will always give you the tools to be able to do so!

Acknowledgements

Thank you to Mor Mualem, a physio who works with yogis and circus humans, for proofreading and adding some interesting anatomy notes!

Does Body Proportions And Size Affect Contortion?

Rhythmic Gymnastics

So, I think people often wonder if there’s a specific body type or size ideal for contortion. After all, specific sports such as ballet or artistic & rhythmic gymnastics favor different body types. Short torso, long legs and overall lean physique is favoured in ballet and rhythmic, whereas artistic gymnastics favours overall stoutness.

Artistic gymnastics

However, the beauty of contortion, I think, is that all shapes, sizes and proportions have their pros and cons not just in terms of skill acquisition but in terms of aesthetics and movement quality. Within the wide vocabulary of contortion, there is a huge variety of ways in which people can move depending on their size, proportions and skill-set. In the end, *your* quality of movement is specific to you, and can’t be easily replicated by someone else. In a sense, there is more room for different permutations of the same skill within the medium of contortion. There are general standards about what consists of correct alignment but within that box, there’s quite a lot of room for individuality: how you perform a move is really up to you.

Pic by Sebastien Loze

Let’s take the idea that certain proportions favour certain skills. Are you thinking of handstand presses, backfolds or headsits, leg balances or handstand push ups? After all, each skill favours a different body type. Even in terms of something we regard as infallible such as aesthetics, there are different ideals for contortion. Even though the traditionally more desired body type of having a short torso and long legs may create more beautiful lines for leg shapes, a curvier body type may accentuate lines in a different way via making things look bendier.

In this blog, I will discuss my own experience (as someone with a short torso, long legs and overall small statue) and, in a future post, I will invite some of my students with differing proportions and size to comment on what it’s like to train different skills. We will cover the pros and cons for our specific body type, as well as some things we find easier or harder!

Some General Trends I’ve noticed!

Karl (@karlevolent on IG) who has a long torso and shorter legs and myself, who has long legs and a short torso. Chest stand headsit is easy for me (basically a warm up) but very hard for Karl.

Generally speaking, I’ve noticed that people with longer torsos and short legs tend to struggle more with mid-back flexibility, but seem to have better hip and shoulder flexibility both active and passive! I’m not quite sure why the latter is so, but a longer spine, generally, means that it’s harder to articulate from every vertebrae. As such, some part of the spine gets left behind. For my students with longer spines, it’s usually the mid-back (with some exceptions). As such, they seem to be better at tricks like teardrop, lunges or needle.

Likewise, I’ve found that people with short torsos and longer legs/arms like myself tend to struggle more with hips and, sometimes, shoulder flexibility as well. However, we tend to have better upper backs. I’ve found that teardrop is a bigger struggle because my torso doesn’t have enough length to bend to reach my ankles. As such, I actually feel knee grab is easier for me!

Please take note that these are general observations! They are patterns I’ve noticed, not facts set in stone. I’ve found many students who also break the mould: students with long torsos with excellent upper backs but subpar hips; students with short torsos who have excellent hips. A lot of it also depends on your background or even your daily posture and habits. At the end of the day, understanding *your* strengths and weaknesses and how it is affected by your proportions is paramount.

This is my first “teardrop” which was actually a knee grab. My friends joked “You’ll learn to walk your hands down after”.

Case Study: Amy (Myself), Short Torso, Long Legs & Arms

So, generally speaking, I do think many think my proportions are ideal for contortion. However, my short torso and long limbs come with some complications as well. On the plus side, I don’t really have to do anything dramatic for things to look aesthetically pleasing. However, it also means I’ve a bit less control than normal of where my limbs do decide to go. Sometimes, even standing up from a bridge is a complicated affair as I forget how to use my quads after standing!

Let’s take certain contortion moves. As aforementioned, teardrop grabbing ankles is actually harder for me than just grabbing my knees. Likewise, hooked triple fold requires me to use my hips a *lot* more than normal. Since my torso is short, there is only so much my spine can bend before my butt is fully on my head and my knees are still off the floor. After that, it’s basically all inner thigh engagement to get my knees to the floor. As such, triple fold for me is very much an ‘active’ fold, whereas I’ve seen others with more favourable proportions just relax into theirs, which is not something that could ever happen for me.

Hooked triple fold is harder for me because I can only bend so much before I’m in a headsit, and then my hips need to finish the fold.
Elbow bridge from Karl and I. This is a super hard one for me because I have to really grow tall through my shoulders to pull through, but this is a warm up for Karl.

Some things are just logistically tricky. Straight handstand presses came very easy for me. Since my legs are long, all I had to do is compress a bit and my legs were already off the floor (it helps that I have naturally good compression). However, staying up in straddle or straight handstand is a struggle: I have to continuously engage my side-glutes (for straddle) and butt + core (for straight) to stay up since my legs, being so long, also have more points in which they could diverge from center, in addition to extra weight. I also have to push a *lot* more through my shoulders in order to be able to “grow my lats”. The length of my arms also means that if my elbows decide to dance a little, the shoulder push disappears easier as the structure is much more easily compromised when you’ve more length. If my arms were shorter, it would be easier for my shoulder push to compensate if my elbows decided to wobble a little (and they do, being very hypermobile). Of course, these are general statements: alignment, compression, and ability to push through the shoulders are all extra factors to consider besides proportions.

Likewise, contortion handstand shapes such as snake and straight-leg snake are harder for me as they require me to reach my legs higher up into space. Hence, the weight of my legs often feels disproportional to the ability of my hips to pike. Scorpion handstand and even bridge press came fairly easy because I just had to look up and there it was. However, contortion handstand push ups are much harder for me since the length of my arms means I’ve a longer distance to travel. Despite all this, I’ve fought for all my push ups due to sheer obstinance. I refuse to let my body proportions dictate what is easy or hard for me.

The length of my arms and legs are most obvious in snake shapes.

Most obviously, perhaps, headsit came super easy for me because of my short torso. It took me only 9 months to go from “can’t chest stand” to “can headsit”. Since I don’t have much spine to bend with and my upper/ middle back is fairly flexible without too much effort (partly because my torso is so short), headsit is almost always and easy comfy place to be. However, shapes like face frame (chest stand hugging feet) or elbow bridge where I’ve to fold from my hips, shoulders and lower back, aren’t as comfy and require a lot more mental preparation.

To Wrap Things Up…

In my opinion, body proportions are, ultimately, what you make of it. They can be a blessing or a curse depending on what skill you’re looking at. However, since contortion is such a broad skill set, it’s uniformly impossible for someone to be good at *everything* all at once. Hence, the cards decked out to us, while not being something we can choose, can be something we can find solutions to.

Because my elbows have no carrying angle, I have to rely on pure shoulder extension (flexion in physio terms) to counter balance my pike.
(Pic by Sebastien Loze)

Anatomy is what you make it. Let me give my elbows an example: they have zero carrying angle meaning they don’t bend at all, so I’ve no option but to use 100% shoulder push for my Mexican to look dramatic. Someone with a 30 degree carrying angle or more doesn’t have to push in their shoulder as much as I do. However, I stubbornly have insisted on training them and have gotten quite good at them, even though I have days I struggle too. Generally speaking, doing extra conditioning via Mexican presses have helped me stabilize the ROM of my elbows so they stay in. Even if something is not ‘meant for you’, there are ways for you to work around them.

Likewise, the same applies to body proportions. Even if teardrop may be hard for you if you’ve a short torso or headsit may be *especially* hard with a long torso, no matter how hard you work, there are ways to work around it. You can choose to work on learning to isolate your middle back, or increase your hip flexibility. There are many paths towards the same shape: everyone’s scorpion handstand may look a bit different depending on their different proclivities. As long as you’re using your lats to push your shoulders, your low abs and inner thighs to stabilize your hips and your upper back to look up, you’re usually fine. So, well, the base shape may differ, technique generally remains similar with minor modifications.

Find a coach who can work with you on *your* body inclinations. Someone who can translate technique and help you strengthen your weak points. Ultimately, contortion training can sometimes be like a puzzle and not everyone has the same key!

Stay tuned for part 2 of this blog post, as I will get some of my friends and students to chime in in regards to how body proportions affects them!

Contortion Q&A: Why Do My Shoulders Tingle In Bridge/ Full Cobra?

The Serratus Anterior: also known as the “armpit muscle” or “the door hinge”. They help you externally (turn in) and internally (turn out) rotate your shoulder actively. They also help with moving your shoulder blades apart (protraction)!
The Lats “hug” your back & assist with upper/ mid back opening. They work together with the serratus anterior, but they’re the main heavy lifter.

You’ve probably heard this yelled at in contortion class a lot: “Don’t wing your shoulders!”. But is it always bad? What is winging, anyway?

As a general rule, we don’t want passive winging of the shoulders, which is when the elbows are flared out and the armpits are turning to the side without any muscular engagement to support it. We always want to shrug our shoulders to our ears to engage our lats (a.k.a “the hugging muscle”) and maintain a slight pulling in of the armpit (which makes the shoulder blades pull apart) to engage our serratus anterior (what I will refer to as “the armpit muscle”) when doing any contortion move with the arms overhead. Extra shrugging and a narrower hand placement actually protects your shoulders, as it helps your shoulder, upper back and neck to go together. If you lose the shrug even by 5%, this can cause your shoulders to collapse and your armpits/ elbows to turn out which, in turn, can cause tingling and nerve pain (more on this later!). You will also notice your shoulders get ‘left behind’ when you arch from your upper back. Try arching from your neck and upper back with a shoulder shrug (what I call “reaching for the cake”) and without, and you’ll see the difference.

“Shoulder shrug” a.k.a “reaching for the cake” with upper back engagement in lunge.
Winging here is an injury waiting to happen, as the weight of the body will push on the rotator cuff. Extra shrug here will protect your shoulders in such an extreme extension.

This is very important in bridges & Mexican handstands, or any position in which the shoulders are brought behind the wrists into what some will call a hyper-extension1  (it’s not actually hyperextension, but an extreme shoulder extension). If you aren’t shrugging enough, your shoulders will start sinking and your nerves will start tingling. Imagine pushing your entire body weight on your rotator cuffs with inadequate shrug and you’ll get an idea of why tingling may happen. Your rotator cuffs aren’t meant to support your body weight: that job goes to your lats. Students who lack the muscular strength or shoulder flexibility to support themselves in a full bridge will have more difficulties avoiding this pain. As such, elevating the feet can help for a better shoulder push. Likewise, training your straight handstands will open your shoulders and strengthen your lats for bridges! As will doing your push ups (the solution no one wants to hear)! Take note that in a shape such as a Mexican handstand, the lats engagement (shoulder shrug) will also help you recover your position back into a normal contortion handstand. The “armpits” (serratus anterior) help, but they are stretched to their full extent here, and pinching can still happen *even if* they’re engaged if you are lacking the lats strength to shrug to the max.

Likewise, in full cobra, tingling will happen if the shoulders are winged period. This is because you’re pulling the shoulder into an extreme extension by straightening your legs, often without proper hip and upper/mid back engagement. What does this do? It pulls on the rotator cuff, causing tingling. When doing full cobra, try fully articulating through your box shape first so your head is closer to your knees.

I call this your “box curl”. What is box curl? Box curl is initiated when you engage your armpit muscles to “hug” yourself *while* using your legs as leverage by pushing your feet away from you, the latter of which lifts your hips. The combination of these two actions helps your entire front body to curl forward, up and back. Your goal is to use your shoulder and hip tension to pull your head more towards your knees. Focusing on the front body tucking in & pulling up and back helps your curl to happen easier. One trick is to always make sure your thighs are “grounded”, and your knees are *at least* at a 90 degree angle or more. If your knees are lifting, your hips probably aren’t lifted enough.

Slight external rotation (armpits in) prevent pain in full cobra, as does narrowing the legs so the rotator cuffs don’t need to overwork to stabilize the shoulder.

When extending into full cobra, a slight turning in of your armpit (so it faces the ceiling) via. your armpit muscles will also protect your shoulder. Therefore, when your shoulders extend, you will not yank into them. Maintaining a slightly more narrow leg distance will also help prevent your shoulders from overworking.

For me, personally, I can’t lose any shrug as my shoulders are quite sensitive. If I try to bring my shoulders back without shrugging adequately (in a regular sitting overhead shoulder position), I get tingling immediately. As such, I always need to maintain a slight external rotation (turning in) of the shoulder in any arms-overhead position. Why does tingling happen, though?

Our shoulder is ball and socket joint which can rotate a full 360 degrees. To support this extreme mobility, there are many tendons, ligaments and muscles that stabilize the shoulder joint. Likewise, there are many nerves that also surround the ball-and-socket which can be pinched if the shoulder isn’t gliding correctly. Often, a little misplacement of the shoulder in its socket causes the ball to rub against the socket, causing nerve pain. This is the source of the oft-common tingling you feel in your fingers— the origin is actually coming from your shoulder! Likewise, if you force the shoulder into an unnatural rotation (ie. pulling your shoulders apart without elevation), you can also cause shoulder impingement and pain as you are pulling on the tendons of your shoulder.

However…!

There are exceptions! When we do face frame, triple fold or even when we grab lower down our leg in needle, we need to wing. But how do we do it properly?

“Opening the door” or internal rotation (armpits open).

Basically, ‘winging’ while sinking into the shoulder (using your rotator cuff muscles alone) is never good. However, if you initiate the ‘wing’ (opening out of the armpit) from your armpit muscles & the muscles that surround your shoulder blade, it won’t feel pinchy at all! I call this “opening and closing the door”. If you imagine your armpits are the hinge of the door, any active winging has to happen from the armpit and shoulder blade, not from the rotator cuff. After all, your rotator cuff is in charge of stabilizing your shoulder— they aren’t so good at heavy lifting. You can have rotator cuffs of steel but this won’t matter if you only rely on them.

As an example, when I want to grab lower down my leg in a needle, I squeeze my side abs to turn my chest to the leg, and I engage the muscles in my armpit to turn out my shoulder actively. This makes the ‘winging’ feel very secure. I also don’t stay here for long! After winging, I engage my back muscles to turn my chest center and armpits to pull my elbow fully in.

Winging can also be done actively in other shapes! It’s only bad when it comes from dumping into your rotator cuffs and not using your serratus anterior (armpits) and back enough, which can also cause damage to the serratus anterior nerve. In many positions, we actually consciously ‘wing’ to make the move even possible.

“Closing the door” or external rotation (armpits closed)

We do something similar in ‘chicken wings’ (when we open out the elbows to the side to pull the chest open) as well as in face frame (the armpits are open to the floor, but the tips of the shoulders pull in in a slight shrug). If you’re staying in internal rotation (armpits open to the side), you need to make sure your shoulders are elevated slightly before they circle back in order to pull your upper and mid back through. In triple fold, we need to ‘wing’ actively to pull the chest through.

On a similar note, some contortionists train their shoulders to death to be able to do dislocates in different positions safely. Take note these aren’t actual dislocations: it’s just the term we use to talk about the movement of your shoulder in tricks such as going from table top to bridge. However, working on dislocations can cause the ligaments in your shoulder to wear down overtime, making your shoulder harder to stabilize. If you’re working on handstands, you *may* want to avoid training extreme shoulder rotations like holding a band and circling it from the front and the back to ‘dislocate’ them.

Active winging in lunge. The armpits are engaged to bring the shoulders into internal rotation (armpits out).

As for many things: shoulder engagement depends and varies on the individual’s body and how they interpret cues. Tingling is, although very common, very easy to avoid as well with the proper lats and armpit engagement. There is no hard and fast rule. However, if you feel like your shoulder is “blocked”, you may want to wiggle around to find the right position in which your shoulder works *with* and not against your upper back. Learn how to use your muscles, seek a competent coach, and the rest will follow!

1 Take note that what we refer to as “shoulder extension” in circus/ contortion to talk about shoulders in bridge isn’t actually extension but flexion in medical terms. To avoid confusing people, I’m staying with “extension” as it is easier to understand.

“I Can Straighten My Legs in Cheststand Yet I Can’t Headsit. Why?”

A lot of students wonder why they can’t sit on their heads even though they can straighten their legs in chest stand. So firstly: no, it’s not because your butt is too small. I have a negligible butt but I can sit on my head. However, I can’t sit on my head if I just blindly straighten my legs by extending my hips. So what’s the secret?

The answer is simple… PIKE! If you aren’t piking in your chest stand, your chest stand will probably feel kind of as if someone is pulling your weight directly into your neck when you straighten out your legs.

All this ties in with how pike, hip extension and flexion works in contortion. This is a complicated topic- more hip extension tends to bring the butt more behind the head and more hip flexion tends to do the opposite. Adding pike to the equation will also change how something looks. To understand this better, it’s useful to think of things in a handstand, instead.

In a contortion handstand, we extend the hip flexors when we straighten the legs. The butt is situated more behind the head rather than on top of it. Shrugging your shoulders stops your body from shifting your weight over too much. To get the feet lower and butt more over, the only option is to open the shoulders so you’re more in a Mexican handstand (2nd pic).

Caylin and I are demonstrating the differences between snake handstand and chest stand in this picture.

Similarly, in a snake handstand, the chest tends to be a bit more lifted and the chin dips down slightly to make way for the butt going over. The hips are locked in flexion. I will explain how this affects chest stand position in a bit!

Let’s now pretend you transferred these shapes into a chest stand. If you straightened out your legs in a chest stand via hip extension alone, you would have to lean your neck way over for your butt to even approach your head. You’d have to pull your chest back very actively. Even then, your butt will be more behind, rather than on top of your head. Likewise, if you tried to transfer the snake handstand into a chest stand, you’d feel *way* too much pressure on your chin. Whether your hips are flexed or extended doesn’t matter- what matters if whether you’re piking properly through your core or not.

If you struggle to understand why you can’t breathe in a piked position, thinking of a snake handstand will give you a good guess as to why- by virtue of the position, your chin will want to dip down. Placing the butt over the head *will* put more pressure on the neck- that’s the nature of the position. In order not to feel suffocated, one must engage their pike muscles properly rather than just pushing their butt over their head.

Instead of only extending your hips to straighten your legs (which tends to makes your feet too light) or blindly piking down (which puts too much pressure on your neck), anchor your feet & drag them along the floor away from you, focusing on piking with your core muscles & pushing your feet into the ground while actively pulling your chest back. Imagining you are squeezing a piece of paper between your thighs (or strangling your worst enemy, if you prefer violence) also helps you to keep a more active, parallel hip engagement. This active hip flexion is the difference between just placing your butt over your head and using your hip flexors to “sit” down properly.

What happens when you find your active pike? The pike closes the distance between your head and your butt. When you straighten your legs, your butt is already in the right position, even if you choose to keep your hips more externally rotated (the legs apart and not together). You can pike with the hips extended or flexed. However, extending your hips without a pike is a recipe for suffocation.

To complicate things, pike engagement can also be found in different leg positions and can be done with both hip extension or flexion! It isn’t so much about how parallel the legs are (although this helps). You can flatten /pike your hips down in a froggy, with turned out feet, with classic feet, etc. The exact position of your knees/ feet doesn’t matter, although some positions can help you feel your pike better than others. I have found that any position where you feel you can inner thighs working (ie. knees fully together or froggy, where the knees are the furthest they can be apart), tends to be easier to pike in. Thinking in terms of what direction your pelvis is going helps- is it lifting up or flattening down?

Angry Sophie

To help understand this further, think of the difference between a shoulder /chair bridge and a hip bridge. In the former, the knees can be straight or bent, but the hips are internally rotated and the pelvis is pushing down in a pike. In the latter, the knees are straightening out, but the hips are extending upwards. Likewise, in a piked chest stand, the core needs to be engaged to create the piked position, even if the knees and feet are turned out. (The exception is the froggy chair bridge, wherein the pike keeps the pelvis pushing down, but the hips are externally rotated into frog.)

I always ask my students to think of an angry Sophie (my pet snake): flatten your body like an angry pancake! Push your hips down, pull the chest back and imagine you’re a panini being grilled. Visualizing this feeling of flattening not just my hips, but also my entire body helps me to also feel that feeling of pulling my chest back more organically. This action of flattening doesn’t happen outwards (legs extending horizontally), but vertically (the body is being squished). The exact width of your legs doesn’t matter if you’re flattening adequately!

An extreme example is mouthpiece. In mouthpiece, one *must* pike the hips down to sit properly, in order for the hands to be able to lift. A full headsit is, therefore, needed. This may be an extreme example, but the same headsit mechanics apply: the stronger the pike, the easier the balance.

Imagine if your butt was behind your head here and you were folding from your hips and lower back: you wouldn’t be able to lift easily. Or if you did, you would be fighting the laws of physics.

Let’s also look at some variations of this in theory, as there are some exceptions to what I’ve explained!

Variation 1:

A small demographic of people can fold from their lower backs easily to extend their hips *while* keeping their chest parallel with the ground. However, if you don’t pike, you’d still be in more of a backfold rather than a headsit, which I argue isn’t the same thing. Here, I’m illustrating how this would work in an assisted handstand. My lower back is stiff, so the table helps me to fold better through my back by forcing my hips to engage. I feel this mostly in my hips, not my back.

Variation 2:

In an overarch, we do rely on hip extension to get the butt to the head. The hips still need to stay parallel for the butt to shift more over the head. Also, the chest needs to be pulled back actively so I don’t need to rely on my hands to stop my neck from crunching. This is somewhere between a headsit & backfold. I feel this more in my upper back.

Variation 3:

This is more akin to a headsit. However, I’m sitting by pushing my feet against the table. The table helps me to pull my chest back so my hips are extending, but they remain more parallel than they would be in a contortion handstand. The location of the butt is slightly behind my head. I feel this in my hips and upper back.

Example 4:

This is a modification of an overarch but with the legs together. It’s a bit clearer here how closing the legs brings the butt directly on top or even over the head. The hands help here to pull the chest back. This is also similar to a headsit in mouthpiece. I feel this mostly in my neck and upper back.

Take note that how your bend looks on your body depends on your body proportions and how *you* bend. As such, mileage will always differ & there are always exceptions to the rule. As always, consult a coach for proper instruction and don’t go about it alone.

The purpose of this post is to show how hip extension and flexion affects how you bend. Piking will always pull the butt more over the head, while extension brings it back. Exceptions aside, if you’re a beginner, focus on your snake and pike chest stand *before* straightening your legs out. This will provide an extra dimension of comfort when you do attempt a headsit.

Happy bending!

Contortion Q&A part 2: Why Can’t I Fly My Flying Cobra?

This is the second part of my contortion Q&A! Here, we answer one of the more common questions beginner students ask me: how do I lift into my flying cobra?

(For a visual explanation, feel free to read the IG post here.)

  1. Why can’t I lift into flying cobra?

A lot of my students have amazing upper backs but can’t seem to lift into their flying cobra. Why? I am going to state it’s actually *less* about flexibility and more about core control and activation. Flexibility is a factor, but it means nothing if you don’t have the strength or technique to execute it!

The red line marks center of mass. Here, you can see the weight is distributed evenly between the upper and lower body.

Well, first of all, flying cobra is enabled by a lower ab lift which shifts the weight of your body up and over from your stomach to your legs. The upper body grows tall to assist, and the front abdominal muscles expand the front body, helping the center of mass to shift towards the legs. Having flexibility in your upper spine helps the lift to happen easier. Tightness in the lats can prevent the upper body from growing tall, making it heavier for your lower body to lift you up and over.

Here, the upper body is fighting the stomach wanting to collapse towards the ground and the legs get dangerously light.

However, the ability to facilitate lifting with the abs is difficult to learn. Flying cobra itself isn’t hard— if someone physically placed you in it and you had the flexibility to hold it, you’d just stay there. However, entering into it *with your own muscles* is a lot harder.

A lot of the time, students who work on flying cobra rely excessively on tools (feet under a sofa, hand weights) to get into the position. However, what is needed isn’t someone to pull you into the position— what weights accomplish — but to build the muscle awareness to lift *up* and back into the flying cobra. You have to pass through the center of mass (the red line in these pictures) in order for the weight to shift more to the legs.

If your spine is elongated over enough so that your hips are lifted off the ground, gravity does most of the work. If your spine is collapsed and your shoulders can’t reach properly, you probably will collapse into your lower back. Imagine if someone put a 40 pound weight on your chest suddenly in cobra— you wouldn’t be able to lift your hips up with your lower abs. It would be too heavy. Hence, the more you engage your entire front body to pull your spine tall — including shrugging your shoulders to reach with your lats—, the lighter it is for your hips to lift.

To find this active lift, I get students to do their cobras with a folded cushion initially which acts as a little buffer, nudging the student into the position. When they engage their lower abs, they feel the cushion slowly expanding. There are also some ways you can use the band to help you lift through your hips— using the resistance to help you find your spine pulling up before going back. However, if you’re feeling it’s too hard, you’re *probably* doing it wrong.

Releasing from box is another way to find your flying cobra.

Many will feel that entering into flying cobra from box is easier. However, in my opinion, it doesn’t count because it is as if someone lifted you into it and put you there already. You still need to be able to have the muscle control to do it from the floor. Hence, another technique is to enter from box into flying cobra, and then try to use your abs to shift in and out of it. This is the ultimate core control exercise!

As with everything, get a coach who can explain these concepts to you and suggest exercises for your individual proclivities. I am only explaining technique. Ultimately, technique is something that should be discussed on an individual basis.

The Complex Relationship Between Contortion and Hypermobility

The Myth of Natural Flexibility

So, it has come to my attention recently that many people think that the main pre-requisite for becoming a contortionist or training contortion is having natural flexibility a.k.a being hypermobile. People are easily impressed by extreme flex, but they rarely consider the strength needed to control extreme ranges. They assume that we bend like this because it’s some innate genetic gift, delivered to us by the gods in the form of Joint hypermobility (JHS) or Ehlers-Dahlos Syndrome (EDS).

Look at this test to access your own hypermobility score. (source)

However, the reality is quite complex: natural flexibility can actually be more of a curse than an aid to contortion training, as it comes with a huge set of contraindications that otherwise wouldn’t exist. JHS can lead to gastrointestinal issues, chronic pain, mental health issues, as well as generally bad proprioception and body awareness (sometimes to the point of dyspraxia). As for EDS, the contraindications are even broader; EDS can and often comes with frequent subluxations and dislocations, chronic pain and fatigue, among many other things. If you suspect you have EDS, I recommend you check this assessment online before considering being referred to a specialist. The short of it is: having JHS/ EDS does not a contortionist make.

The truth is that there are many people who have a high Beighton score (the score we use to measure joint hypermobility), but they may actually be super tight since their body compensates for excessive mobility with tightness in other parts of the body. Others may be unable to control their back, so much that they flop into a headsit, yet they may feel pain in their daily lives because core isn’t strong enough to support their excessive mobility.

Flexibility Without Strength Is Injury Waiting to Happen

Anyone can be a floppy noodle, but it takes a lot of strength and control to stabilize a flexible body. Kids, in particular, have generally more flexible ligaments than adults. However, if a flexible kid doesn’t focus on strength and conditioning, they will lose their flexibility after they hit adolescence and their ligaments harden up.

Having higher-than-average flexibility in your ligaments means you need equal amounts of strength to support it. If you have a naturally mobile lower back, you need super strong core muscles, side abs, glutes and a consciously activated pelvic floor to support it. If you have naturally flexible shoulders, this may mean you struggle with using your lats and serratus muscles to keep them from internally rotating/ winging out. The general rule is: the more naturally flexible you are, the more strength and stability you need to control your movements.

Generally, flexibility of any range without stability will lead to injury: think of it like trying to build a castle out of sand. If you try to go into a triple fold purely from the flexibility of your ligaments, your muscles don’t have the stability to support this depth of bend, eventually leading to injury. A naturally flexible person may be able to do a triple fold if someone put them in it, but do they have the strength to pull into one by themselves? There are plenty of people who have natural flexibility but no control. But having flexibility without equal amounts of stability is simply asking for injury to happen.

Triple folds aren’t purely passive either: the body positions you need to accomplish to enter into it require a lot of strength and stability to master.

I am saying this also because I have been seeing a mentality among naturally flexible people that they have reached the end of their back flexibility and hence, they don’t need to work more. This is a lie. Everyone has something to learn about building, maintaining and training flexibility sustainably. If you think contortion is just about being flexible, you’re deeply wrong. If you think you can headsit easily and that’s all there is to it, you have a very superficial understanding of what goes into flexibility training.

Contortion Training Is More Than Just Bending

Contortion training, however, isn’t just deep bends and triple folds. It’s also being able to hold a beautiful split upside down, having clean lines and transitions, controlling your exits and entrances, and being able to perform contortion without seeming like it is an effort. Hand balancing is part of contortion, and not something that can be subtracted from it. It is a performance art for a reason.

You wouldn’t approach a contortionist who can do a contortion push up, one arm and triple fold in the same act and tell them that they must be able to do things only because of hypermobility, right? (I hope) that it is obvious that there are certain skills that require hard work, dedication, correct training and consistency to achieve. Why would we think flexibility is any different?

Penche is a good example of strength and flexibility combined, and a pre-requisite for much harder contortion tricks.

Contortionists work very hard on strength and stability to be able to make transitions seem seamless. It’s easy to take a picture of a deep bend. It is an art to be able to enter and exit into it gracefully, without looking like you aren’t breathing and dying from the exertion. Someone who is naturally flexible may be able to flop into a bridge, but can they control their range-of-motion so much that it becomes an art-form?

Hypermobility Is a Spectrum

We tend to assume you are either hypermobile or not. However, the reality is that everyone has different and varying degrees of natural flexibility and this does change how you bend. Hypermobility is a spectrum and we are all on different points of it. For me, personally, I have a Beighton score of 5, which is the base score needed to classify as hypermobile. The external rotation of my hips is natural, meaning that straddle and middle splits came easily to me without much work. My mid-back is also natural and I have very hypermobile wrists and elbows. However, my low back and shoulders are stiff. My neck flexibility had to be trained. My upper back opens only if I use my lats properly. What does this mean?

M-sit is a pose that requires high levels of shoulder and core stability to do without breaking yourself.

As my hips are more natural, they are also more prone to injury. It’s easy for my hips to click or pop when externally rotated, and I have had to work a lot on lower core and glute conditioning to stabilize my hips. Similarly, because my midback is natural, I need to stabilize it a lot with my lats. However, because my low back and shoulders are stiff, it ironically gives me the ability to do Mexican handstands without worrying about breaking myself: the innate stiffness of my muscles protects me so I can work on extension safely.

When we think about hypermobility, most people think that it means you’re flexible in all parts of your body. The reality is that you need to know which parts of your body are more flexible than others and do more strengthening and conditioning to support it. Ironically, hypermobility may cause you to have tight hamstrings or a tight upper back, as your body tries its best to stiffen some parts of it to protect you from injury. This isn’t a bad thing! You just need to know how to work with your body’s strengths and weaknesses. Condition the mobile bits, stretch the stiff bits.

Strength Training =/= Stiffness

There is also this mentality that the more we strength train, the stiffer we become. Perhaps this myth is perpetuated by Olympic weight lifters who can lift immense weights but who may be very stiff because they do not stretch out after. However, if you’re flexible in any way, you *need* disproportional amounts of strengthening to balance it out.

Contortion push ups are a mix of strength and flexibility.

If you struggle with being a floppy noodle, condition to death. There isn’t a limit to how much conditioning you can do. And I don’t mean just sit ups: look up different forms of glutes, low core and pelvic floor training. Don’t be afraid to take up weight lifting if it’s something that appeals to you. Take up aerial and take straight hand-balancing seriously. All these disciplines will ‘stiffen’ up bits of your natural flexibility so you can control it better, ironically making it easy for you to bend deeper, easier.

Btw, I know many hypermobile people who are *insanely* strong, even being able to do advanced presses like stalder press. However, you may have a super strong body yet be unable to stabilize yourself in contortion shapes. Contortion takes a level of strength and stability that’s beyond what we may assume is ‘strong’.

Whether you are naturally stiff or flexible (although, as I have established, these terms are subjective entities), focussing on active flexibility and using your muscles to bend rather than relying on being warm will also help you warm up quickly and stay warm longer. Active flexibility helps everyone, regardless of your natural flexibility.

Coaches Need To Educate Themselves About Hypermobility

Since hypermobility is so common in circus and dance worlds, I feel that coaches have a responsibility to educate themselves about hypermobile bodies and conditions like JHS/EDS. Hypermobility isn’t good/ bad in-of-itself. Ideally, you want a bit of hypermobility but not excessive amounts of it. It *is* helpful to have some degree of natural mobility, but having too much actually means you progress slower as injury risk is higher. The key is knowing how to train flexibility with hypermobility in mind and understanding what kind of strength work helps hypermobile people feel less pain and helps them train more sustainably.

Personally, I have many students who have naturally flexible upper backs, lower backs, shoulders, necks: the whole gamut. However, I wouldn’t necessarily say that there’s one rule of what constitutes good training for everyone. One person may have a flexible upper back but a stiff low back, so they need to work more on hips. Others may have a natural low back but struggle with any active shoulder extension, etc. For example, the cue of engaging your butt may work great for someone who doesn’t use their muscles period, but it may hurt someone’s low back if they’re used to using their muscles too much. Coaches need to adapt to each student’s body and understand how they compensate.

The reality is that every body is different with different proclivities and compensations, and coaches *need* to consider hypermobility when coaching kids and adults. In addition, coaches should stop pushing this idea that “pain is gain”: the idea that stretching someone to the point of pain is a positive thing. Rather, there should be more focus on muscle activation and teaching students how their bodies work, as well as how they usually compensate and how to fix it. If a student isn’t aware of their own body, they may not be in the position to tell their future coaches what moves are productive or not for them.

In Summary

This is a shape that doesn’t come naturally to me as I have a naturally stiff low back and shoulders.

Stiffness is not a curse. Flexibility is not a blessing. The reality is a bit more complex than that. A stiff body part can become a blessing in disguise, if you learn how to use the muscles around it to open it up properly. Flexibility can be a curse, if you do not understand how to use your core and stabilizing muscles to support it. A floppy noodle, however, will always get break apart in the long run, making bending painful and unsustainable.

Both floppy noodles and stiff boards have to work equally as hard in contortion training. Floppy noodles may have to do 3x the amount of strength training as someone who is more naturally stiff. Likewise, a naturally stiff person may benefit more from PNF or more passive forms of stretching (although I hope I need not say that there’s no truly passive stretch). Everyone benefits from strengthening their end ranges through active flexibility.

In short? The myth of natural flexibility equating to contortion is a lie. Contortion, in reality, is a performance art form that requires equal amounts of strength, stability, balance and body awareness. It isn’t just about being flexible, but also about cleanly executing moves and being able to train flexibility sustainably to an old age. The next time you assume contortion= hypermobility, I hope you rethink what “hypermobile” actually can connote for contortion and circus training.

Crookedness: How Do We Fix It?

We all have uneven sides. In a way, you could say that no one is naturally completely symmetrical. However, as contortionists, I find we’re more obsessed than most about having perfect symmetry. I think this is partly because any form imbalance is accentuated when you’re in a chest stand: you can clearly see if one side of your back or hip is bending /pushing down more than the other, and it’s quite unsightly!

You can see in the top picture my right hip is popping up a lot more, this time because of a back (rather than hip) imbalance. My right side of back is less flexible than my left, so it bends less.

What can we do about it though? I think one mistake is to call our less flexible side our “bad side”. Often, our less flexible side is also our stronger side, or the side you use to kick over into a handstand. In addition, your more flexible hip is often your hip that likes to turn out more, so it may be actually your bad side needle or bridge press side! I find natural flexibility in any body part makes it harder to stabilize: a turned out hip has to be reined in more for certain tricks. Likewise, a more flexible side of the back may actually make some tricks like one leg bridge catch harder.

Instead I like to think in terms of form and function: use your weaker side more, bend your flexible side less. As such, take note that when I say ‘bad’ side, I’m referring to how that side functions for a specific skill. Don’t think ‘bad’ is in concrete, but as a fluid term that changes depending on the skill discussed.

For myself, I’ve been able to correct most of my back issues over time, although this is a work-in-progress that I continuously work on every training. I have a naturally flexible left hip and my right lower back is stiffer than my left from my history of doing aerials, and these are all issues that have caused problems in the past.

In this blog, I’m going to share some tips that helped me become more even. Do note also that correcting your uneven sides often makes you feel more uneven: this is normal! I remember that I used to feel twisted when my coach Kyle would arrange my body so it was symmetrical, and I felt that I couldn’t replicate it by myself. However, I did find that these corrections steadily became more subconscious with time. Also, oftentimes, your ‘bad’ side feels off not so much because it’s worse than your ‘good’ side, because you’re just not as used to it. Hence, your brain tends to make things feel worse than they are. Working on your bad side is psychologically difficult! Be kind to yourself. That being said, here are my tips…

Lunges are largely underrated but they’re the best exercise to stretch everything. There’s many ways to make your lunge more interesting: add blocks on knees, do it leg elevated, inch the front foot forward, etc.
  1. Working on asymmetrical bends such as lunges

Lunges are a great way to correct your back! However, always think bottom up: make sure your hips are square and that you’re not twisting from your lower back. Oftentimes, what feels like a shoulder twist is actually a rotation in your lower extremity (usually the pelvis).

One technique I like to use to correct a crooked lunge is ‘robot arms’, which is when you’re pulling the less-flexible side into compression by pushing against the wall, while you pull the more-flexible side into extension by pulling it to the sky. This forces you into a more even bend by default. You can also grab the opposite side shoulder to ankle and squeeze that elbow all the way into center and use your other shoulder to push straight. This accomplishes something similar.

The band placement here helps me to even out my back by encouraging my hips to square better. Also note how my arm placement helps to even out my back.

Another way of making your lunges more symmetrical is by pushing into a wall: if you feel like one of your shoulders is popping up more than the other, examine your hips and lower back and make sure they are not twisting. The body always wants to turn away from the front leg, so by squeezing your same side lower back as front leg, you also help to reduce twisting. Make sure, also, that you are always pushing your hips down in your lunge. If you go into your lunge and correct your back but neglect to push your hips, you’ll just cause yourself lower back pain.

However, I would have to state these compensations vary from person-to-person. I’ve seen people who have perfectly square hips and a slightly twisted lower back; a perfectly square lower back and hips but twisted shoulders, etc etc. Everyone cheats differently. Don’t be afraid to draw a line in the middle of the body when doing lunges and try to draw everything to your midline. Your knee, hips, shoulders and chest shouldn’t deviate from this line. I would highly suggest getting a coach, because these details are very hard to spot! As such, it helps to have an external eye check in on your form and explain how you’re compensating.

2. Working your less flexible side + weaker side more

If you’re a performer, train your less flexible side only during training so you don’t overuse your good side during performance and rehearsal. If you’re a coach, demo only with your less flexible or weaker side. Don’t rely on what’s already good: it will always be there! Rather, take these opportunities as chances to get better at what you need work with.

I find this move psychologically challenging to do on my bad side. I try to do it anyway, but oftentimes I use other ways to even out my back after doing it that accomplish the same end goal.

In training, always try to start with your bad side, do your good side, and then return to your bad side. If you’re kicking over into a handstand or doing your handstand drills, come out of it with your bad side. If kicking over with your bad side really scares you, train the negatives: a little goes a long way!

I find this is harder said than done. What has helped me is to kick over with my bad side when I’m doing my one arm holds, or when I’m working on skills that’s completely unrelated to my bad side. If I’m doing skills like rainbow marchenko (which is particularly awful on your bad side) and I’m psychologically burned out and unwilling to do my bad side more than my good side, I try to even it out with other skills like cobra grabbing the ‘off’ leg. As long as you’re evening out your skills in one way or the other, you’ll be fine. Some of my favourite ways to do this include: doing your bad side lunge /needle/ oversplit more or doing cobra or teardrop grabbing your bad side. Remember: You want to find a way of working your bad side that is sustainable, that you know you can consistently do.

3) Strengthening my low core to death

It’s important to note that your more flexible side needs more support than your less flexible side. Because it is more flexible, it is more prone to collapsing if not stabilized. You need to strengthen your weaker side’s lower back, side butt & lower abs more than the stronger side. Doing your active flexibility drills such as bad side leg lifts, penche, etc, will go a long way into evening you out!

Personally, I once found out how to open my relatively stiff lower back and this resulted in me overusing my left (more flexible side), because I didn’t instinctively know what to do with this newfound mobility. This is quite common! What helped (besides regular physio visits) was focussing and returning to basics: strengthening my lower abs and side butt. A stable lower core helps you to have a stable base to extend more evenly from, so you’re not collapsing on the more flexible side!

My right hip is noticeably higher than my left also due to the structure of my hips. However, my back is more-or-less even. There are some things that are realistic to correct and others that aren’t. I try not to obsess over my hips since I cannot change my bone structure.


4) Use a mirror

Using a mirror helps you to check your symmetry. Doing your cobras with the mirror behind or chest stands with the mirror in front can go a long way to making the minute shifts you need to be more even. However, don’t overdo it. Mirrors aren’t always there for you, and you don’t want to get too obsessed over perfection. If you correct your habits, symmetry will come with time.

In Short…

Working on your bad side initially feels like torture. Take solace that this psychological hell slowly decreases with time, but you need to constantly work on it every training. One could say it is an endless work and some tricks will always be hard, especially when it comes to hip asymmetry. Keep on at, anyway. Correcting your bad habits is just like correcting any habit: you have to get used to doing what feels initially uncomfortable, till it becomes a new habit. Persistency rewards, as well as small, consistent efforts.

Correcting bad habits is also much harder than learning new skills: this path is long, arduous and frustrating, so don’t be too hard on yourself. Try not to obsess over each degree of asymmetry each training, but focus on what you need to do to get done. I have discussed this topic with Dr. Howard Bird, a professor of hypermobility who I’ve worked with to enhance my training. He has told me that us contortionists are sometimes a bit too fixated on small details, and the slight variations away from perfect symmetry that we obsess about doesn’t always cause long-term problems. You need to be able to also distinguish what issues are ‘real issues’ and what issues can’t be changed, because it’s due to the shape of your bones. Keep that in mind! As long as you’re conscious of your individual eccentricities and know how to accommodate them, change does happen over time.

7 Tips for Managing Fear When Doing Contortion Or Hand Balancing

Fear is something everyone experiences, whether it be fear of turning upside down in an inversion, dropping back to the floor, or jumping up on canes. Unless you are a kid (so your brain hasn’t developed relevant fear centers yet), fear can actually be healthy! I like to think of fear as an evolutionary protective mechanism to prevent you from doing stupid and dangerous things, so there is a place for it! However, you do not want to have it limit you and hinder your ability to progress.

Personally, as I am learning to balance on my canes from a height of a meter, the fear is quite real and something I face on a regular basis. This is a learning process for me too. That being said, here’s some tips you can put into practice when experiencing any type of fear related to training…

Overarch on canes initially felt super scary. I used blocks to allow me to lower down slowly while controlling my core on the first day. After a couple of days, the fear disappeared as I learned how I could control my body here.
  1. Practice Safe Progressions, Engage Correctly!

Firstly, make sure that you are practicing safe progressions: don’t run before you can walk. For example, if you are scared of doing a dropback, have you adequately understood how to activate not just your hips and low abs/core, but also your upper back, neck, shoulders and lats when dropping back? In such a case, it’s useful to isolate dropbacks into two components: the C back part and the hip engagement part. There are also ways to get over the fear, such as doing it from your knees with the same engagement, or lowering to a higher object then coming back to standing. A coach will be able to safely lead you through these progressions.

If you’re afraid of inversions, make sure you fully understand how to engage your lats, shoulders, cores and other relevant body parts (depending on the inversion) before you turn upside down. Don’t just give it a go and wish for the best. That’s usually a recipe for disaster.

This is also where the next point comes in…

Caylin is spotting me in a trick I would otherwise to be too scared to lift off initially. Now, I can manage this on my own.

2. Get A Qualified And Experienced Coach

This is self-explanatory. An experienced coach would have trodden through the path you are threading on now a hundred or thousand times and more. They will know how to lead you safely to relevant safe progressions, as well as know whether you are ready for it yet.

Having a coach there for you also reduces inner ‘brain noise’. When you’re doing something you’re afraid of, your brain will be quite vocal about the reasons why you shouldn’t even give it a try. Having a coach means you don’t have a choice but to try, so try to put your faith in them and let them lead you towards where you want to be. Surrender a bit of your self-doubt and fear to them.

Of course, make sure your coach actually knows the pathways and progressions for a trick! If someone has never done a chest stand, they probably won’t be qualified to teach you how to do an overarch. This is subjective: some people have a strong technical understanding that enables them to coach tricks they can’t do. However, I do think that for flexibility training, having firsthand experience goes a mile since there are nuances you simply do not know until you have done it. Also, be sure your coach doesn’t skip steps when coaching!

Flipping forward here is not an option. Having fish tanks you can break is added incentive to not fall and makes me engage extra.


3. Know How to Bail Out.

This one is super important! Before you ever even attempt anything, you need to know how to bail out. There are practical and impractical /dangerous ways to bail out. For example, if you are training a straight handstand, try not to bail out into a bridge cold! Simply cartwheel, forward roll or twist to the side. There is really no need to put such an impact on your back, even if you are flexible. If you don’t know how to do a forward roll or cartwheel, learn those first! They will also help you find your balance upside down.

If you are on the canes, make sure you know how to drop down from them safely. Flipping over isn’t an option, so you need to learn how to push up through your shoulders and core to flip backwards if you do lose control. When doing leg balances, something similar can happen: if you feel like you’re falling, you use your core to pull everything to center.  Upping the stakes by balancing on a block or bosu ball can also help you find your balance better, as it helps you engage more towards your core.

A similar trick can be used for dropbacks: if you feel like you are about to collapse halfway through it, use your core to pull yourself up to standing rather than falling onto your hands! Likewise, with an overarch, if you feel yourself tipping over, don’t just grip with your hands, use your core to lift back up to your starting position, and also make sure you’re engaging correctly in the first place. If you are engaging your muscles correctly, however, you don’t usually have to make such minute corrections as much.

When Caylin and I practiced our first handstand on triple fold, we used a stool so she could slowly transfer her weight on me and check in continuously on me, as well as bail out safely after.


4. Use Physical Objects To Help You, But Don’t Rely on Them!

You can also use physical objects to help you: have a wall ready when kicking over, and be aware of where your body is in space. If you’re doing a contortion handstand, you won’t be able to kick over with the wall too close. Likewise, how you kick into a contortion and straight handstand is vastly different. For a contortion handstand, it’s actually more useful to kick over onto a chair rather than a wall, for reasons related to how you are using your back and hips. It’s also important you know the object you are using and which points of balance it has, so you know how to use it instead of falling on it.

However, do not rely on physical objects to balance. Know they are simply aids for you to find your balance, not for you to depend on. If you are a year into hand balancing and you’re still using the chair because you’re too afraid to stand on your own two hands, you should maybe try to discipline yourself to stay away from furniture until you feel you can balance. After all, what is the worst that could happen? Which leads me to…

5. Imagine The Worst Possible Scenario: It Probably Isn’t That Bad!

This is a psychological trick I use on students. Oftentimes, people are afraid to roll into a chest stand. However, the worst possible thing that can happen is them falling on their side, which isn’t so bad, is it? The brain tends to amplify and distort reality beyond what is true. Know that these are simply brain tricks: how you feel is rarely an accurate reflection on reality. I like to imagine what’s the worst possible scenario (flipping forward on canes and in an overarch) and prepare for that case by giving myself specific cues (push up through shoulders if I flip on canes, use core to pull up if I lean over too much in an overarch).

Of course, having a healthy amount of fear is good, but be able to distinguish between what is really dangerous (ie. falling into a bridge cold) and what feels dangerous (ie. falling onto the wall, but my elbows will give out and I will twist and die). If you’re engaging your core, anyway, none of these things will happen!

Needless to say, if you can’t headsit, you shouldn’t be doing mouthpiece. There are some things that are common sense.

6. Make Sure You Meet the Pre-Requisites For A Trick.

Are you sure you’re ready for what you want to do? Sometimes, fear is a self-protecting mechanism. If you’ve never climbed up a silk, don’t ask your coach to teach you how to do a windmill down! This is simply unrealistic and dangerous (I’m saying this, having had someone ask me precisely this). In order to know if you’re ready, ask your (hopefully qualified) coach if you are. They will give you a realistic idea of what you can/ cannot do, as well as the steps you need to take to get there.

7. Fall, and Fall Many Times!

This one is something people may not want to hear, and it also doesn’t apply to everything. For example, falling in mouthpiece is simply not an option, so I need to always use my core to balance no matter what. However, for most things and if you are learning handstands, you are going to fall. Accept this. Falling is also a way you realize that what you fear isn’t as big and scary are your brain makes it seem. As long as you are bailing out safely, you will be fine.

To Wrap Things Up…

Mexicans are quite scary to fall out of, but you sort of need to get used to falling when training them. As long as you’re strong enough to train them, you should be fine (hence: consult a coach). I can’t tell you how many times I’ve fallen out of these ones.

I think there are rational and irrational types of fear. Be able to distinguish between the two. If you are months into a trick and you are still scared of it, this isn’t quite normal. There is a moment you need to take charge of your brain and also be honest about what fears are ‘real fears’ and ‘false fears’. Discuss this with your coach, if this is something that is haunting you.

Lastly, remember that fearlessness comes only when you do things progressively with the relevant steps, and if you give yourself time to process and get over it. Some things help: getting a coach, practicing till the fear disappears, learning to fall. However, you simply won’t get over your fear unless you practice many of these steps as a whole.

Feel free to comment any of your training-related fears and how you are trying to get over them!

Lessons From Contortion: Eight months in

chest stand progress.jpg
February to September progress

When I started contortion, I was not strong at all. I had lost weight from two bouts of food poisoning and stress, and I was quite visibly underweight. I had to build strength over time to balance my flexibility. Disclaimer: I am naturally flexible to an extentBefore doing contortion, I had done two years of constant yoga practice but then stopped completely for a year. When I did my first chest stand this February, I sort of flopped rather ungracefully into it, reaching for the life of me to touch the floor. I had no sense of how to isolate my upper back muscles to help me to bend slowly into it. I had a good sense of body awareness because of yoga, but I wasn’t equipped to take on the intricacies of back bending.

Some hypermobile people like me go into contortion and accidentally injure themselves because they do not build strength to support their naturally hyper-lax joints. Other hypermobile people tend to be too mobile in some parts of their body, but tight in others (although I was flexible as a kid, I couldn’t touch my toes because of tight hamstrings).  People with hypermobility have overly lax joints, but that doesn’t mean they actually have the strength to support their bendiness. This results in innate imbalances in which their body compensates for their lack of stability by becoming tight in different areas. If you go into a chest stand without the right stability as a hypermobile person, you may be able to do it, but you may also break your back if you do not have the right musculature to support such a movement.

chest-stand-one-leg.jpgHowever, I think that contortion can be great for hypermobile folk in building strength, body awareness a.k.a proprioception and the ability to make beautiful shapes with using the power that comes with the union of body and mind. Hypermobile folk tend to have bad proprioception (I do), and contortion is, for me, an intense practice of focus and concentration in which I am completely in tune with my body. Rather than forcing it to do things with my blunt will, I listen to it so I know what adjustments I have to make in order to get to the place I want to be.

There are two main ‘technical’ lessons I learned in back bending: how to isolate each part of the spine (cervical, thoracic, lumbar and sacrum) and how to use engage and relax different muscle groups during each pose and transition. There is a poetry and art to this that’s quite intricate and requires a deep listening to your body in order to figure out. That is also why I think having a coach is rather useful, so you may learn those lessons quicker and more efficiently and perhaps prevent injuries because of the body’s natural need to compensate.

Goh, Between the heavens and the earth, I surrender my vessel.The other lessons I’ve learned from contortion have been mostly psychological. Contortion challenges you with your deepest fears everyday. It forces you to do what is unnatural to you, to expose your heart in a way that feels like you are laid bare. Bending backwards is also a way of freeing the energy of the heart (and I hope you bear with me as I become a bit esoteric, but I promise there’s a practical application). Bending your back is not a natural position and challenges our idea of what is safe and dangerous. When you expose your chest, you are also showing strength in being vulnerable.

The other challenges that come with contortion are that of conquering fear by making fearful things your norm. When you twist yourself into a new position, your body sends out anxious signals that this is not normal. Get out! even if there is no physical pain (and there shouldn’t be. If there is, stop!). The process of contortion is also learning how to reprogram your brain so you associate twisty, insane poses with calmness and positive feelings which I promise you is no simple task. I do this through breath work (slowing breath to activate the parasympathetic nervous system) and also by thinking happy thoughts when I’m in difficult and stressful positions. Learning a new pose always brings up anxiety, even if I can physically do it. Also, the body changes everyday. A pose may arrive one day magically and disappear for months. Or a pose may be accessible everyday, but be filled with difficult emotions until the body gets used to it, then the mind accepts it as ‘normal’.

working progress.jpg

Recently, I was doing a rather simple but difficult pose: trying to push my chest through my legs while holding onto my feet. This pose requires me to use my hips and upper back in a way I wasn’t used to, so it felt impossible. However, I slipped into chest stand after and that suddenly felt like a place of comfort and ease. I realized then that I have successfully programmed my brain to accept contortion as normal. And that the process now was of adding more shapes and places that my brain could add to its encyclopaedia of weird and wonderful experiences.

41438424_269974170289422_9212193692977201152_n.jpg
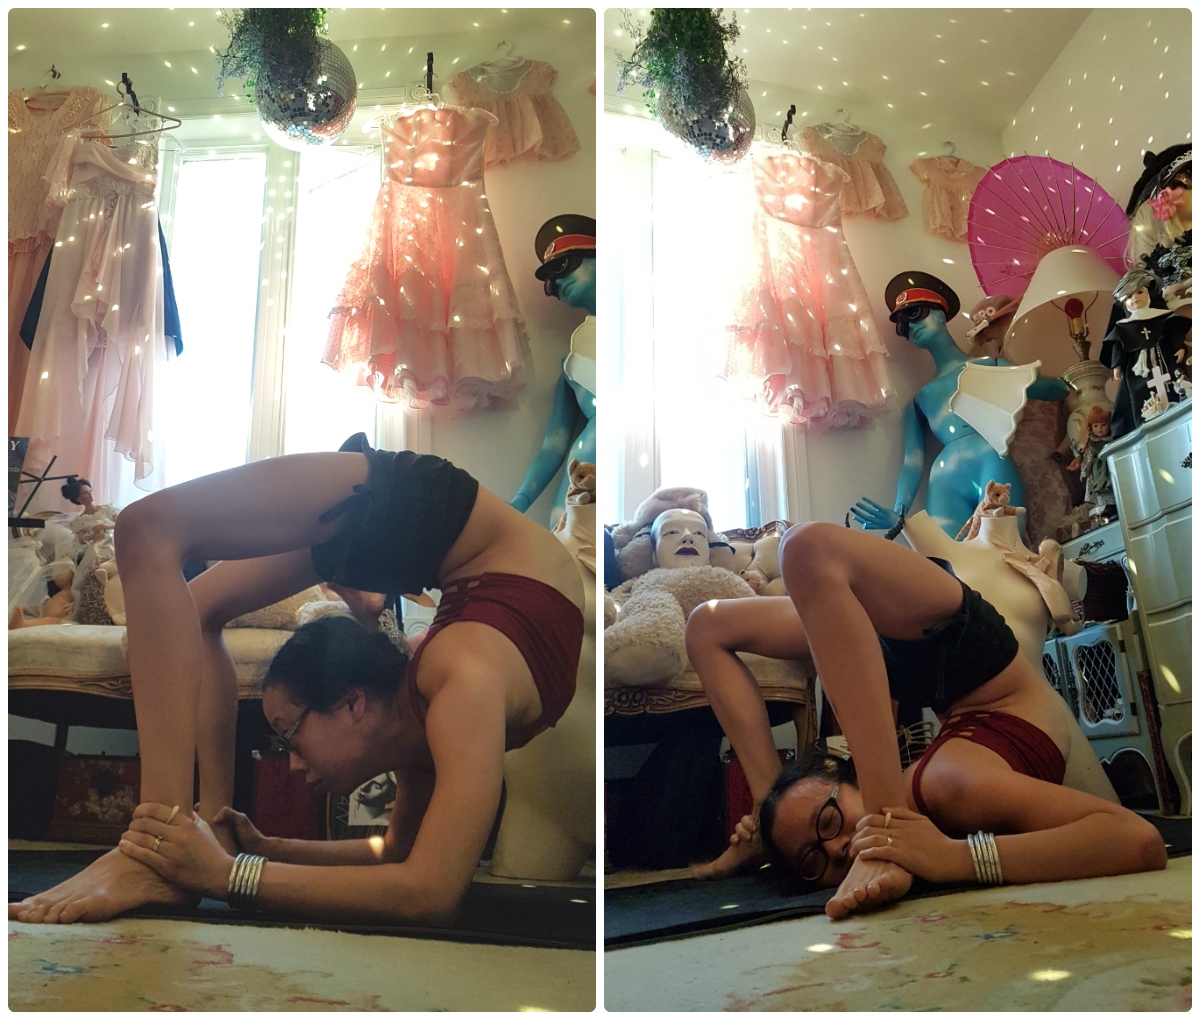
My favourite part of contortion, by far, however, is uncovering of the riddle of a pose. There is a space before a pose is accessible in which I have to use my brain to figure out what I can train in order to get my body ready for it. For example, if something feels impossible, I look at it from another angle: 90 degrees to the right, to the left or upside down. A needle scale, for example, is also a chest stand split and a split backbend. If you can do one pose in another angle, you can probably do it in its traditional version. It’s matter of figuring out your limiting factors through the process of listening to your body and studying the anatomy of a pose, so you know which parts of your body to engage and relax.

If you are beginning contortion and you’re not naturally flexible, do not despair. I honestly believe that someone who is not naturally flexible has their own advantages: you are able to build strength and flexibility alongside each other, reducing the chance of injury. It will be slow, but flexibility is a long journey. The body takes a ton of time to create just a minute amount of muscle length. However, if you fall in love with the practice of bending, then I think you will get to the place you want eventually. Be patient, train consistently and intelligently (by that I mean using good alignment), and all the good things will come. There is a magic in the practice of contortion, a little space of possibility that is exhilarating. Fall in love with it, don’t be too attached to your goals, and remember why you are doing it in the first place.